


Web Landscapes Guides Forward your domain's email
Good news: this guide is now free. Download it below, no code needed.
Forward every email at your domain to the inbox you already use
Mail sent to any address at your domain (info@, hello@, anything@) can arrive in the inbox you already read, like your Gmail. It's free and takes about 15 minutes. We set it up on November 16, 2026 for a misspelling of our name that we own, so mail sent to the wrong spelling still reaches us.
- Time
- About 15 minutes, plus a few for the verification email
- You'll need
- Your domain on Cloudflare, your Cloudflare login, and the inbox you want the mail in
- The result
- Mail to every address at your domain arrives in your inbox; you reply from that inbox
Before you start
- This only receives. Your replies go out from your own inbox (your Gmail address, for example), not from your domain. To send as name@yourdomain.com you need a real business mailbox: see Set up business email with Google Workspace.
- Your domain must be on Cloudflare, using Cloudflare's nameservers: in your Cloudflare account's list of domains it says Active. If it's still at GoDaddy or another company, move it first with Move your domain from GoDaddy to Cloudflare.
- Have the inbox you want the mail in open in another tab or on your phone. Cloudflare sends one email there to check it's yours.
If you already send and receive email at this domain with Google Workspace, Microsoft 365 or any other email service, don't do this. Forwarding replaces your domain's mail settings, and your current mailbox would stop getting new mail the moment you switch it on. Do the check in the next section first.
Our screenshots show our second domain on our own Cloudflare account. Cloudflare changes its screens often; if a button has moved or has a slightly different name, look for the closest match.
Check that your domain has no email today
Ask yourself
Do you log in anywhere to read email at this domain (Gmail with your domain address, Outlook, your domain company's email, Zoho)? If yes, stop here.
Look for MX records
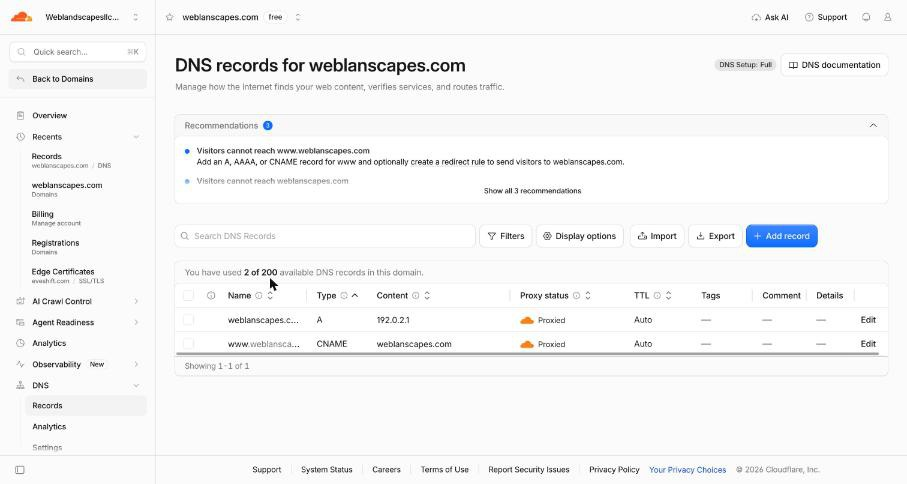
In Cloudflare, open your domain and go to DNS > Records. Look at the Type column for rows that say MX.
- No MX rows, like ours below: your domain gets no email today. Go ahead.
- MX rows that mention
google.com,outlook.com,secureserver.net,zohoor anything else: your domain already has email. Stop. Never delete MX rows to make room for forwarding. - MX rows that say
route1.mx.cloudflare.net,route2androute3: forwarding is already on. Skip to Add the inbox to forward to.
Catch-all or single addresses
A catch-all forwards every address at your domain, even ones you never planned: info@, sales@, a misspelled name. A single address (Cloudflare calls it a custom address) forwards only the names you list, like info@, and mail to anything else bounces back to the sender.
- A catch-all suits a second domain or a misspelling of your name, where the point is that nothing gets lost.
- Single addresses suit your main domain. A catch-all there also collects spam sent to made-up names. You can start with a catch-all and switch later in two minutes.
Turn on Email Routing
Open Email Routing
In Cloudflare's left menu, go to Compute > Email Service > Email Routing and pick your domain. Some accounts also show Email > Email Routing in the domain's own menu. The first time, Cloudflare walks you through a short setup; if it asks you to create an address straight away, you can skip that part.
Add Cloudflare's records
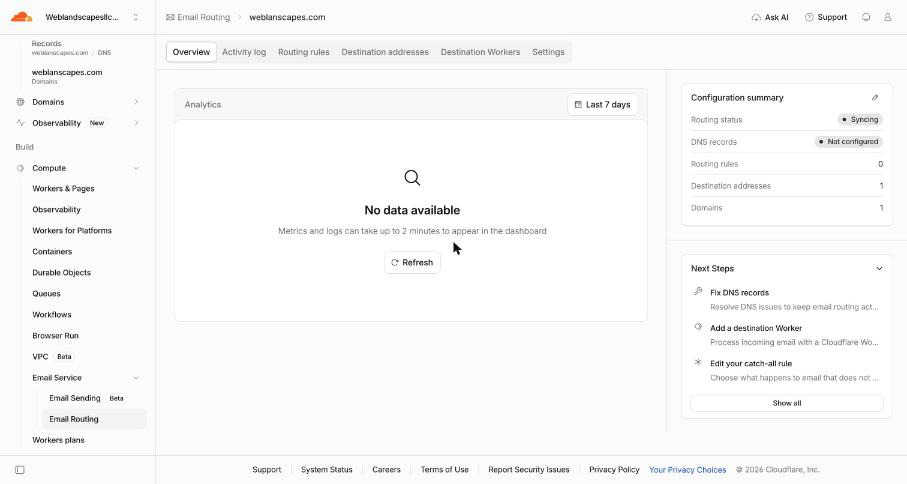
On Overview, the Configuration summary says DNS records: Not configured. Under Next Steps, click Fix DNS records.
The Settings tab lists the records Cloudflare needs: three MX rows and two TXT rows, each marked Missing. Use the button there to add them, and confirm. Cloudflare adds them for you; don't type them yourself. The Priority numbers are different for every domain, so never copy ours.
 You'll know it worked when
the rows no longer say Missing, and the Overview shows the DNS records as configured. It can take a few minutes; click Refresh on the Overview.
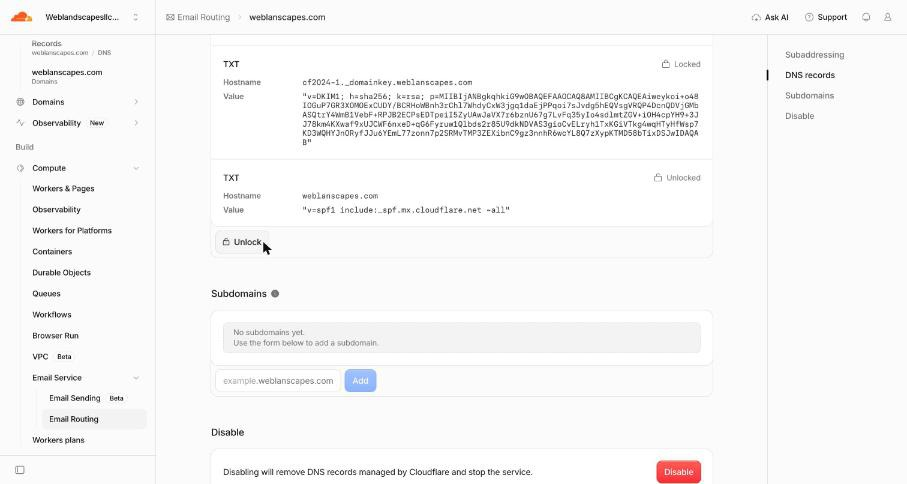
Leave these records as they are. The Disable button at the bottom of Settings turns forwarding off again and removes them. If Cloudflare says other MX records are in the way, your domain already gets mail somewhere else: stop.
Add the inbox to forward to
Add the address
Open the Destination addresses tab. Type the address of the inbox you read in the box at the bottom (it shows
user@example.com) and click Add address. It appears as Pending.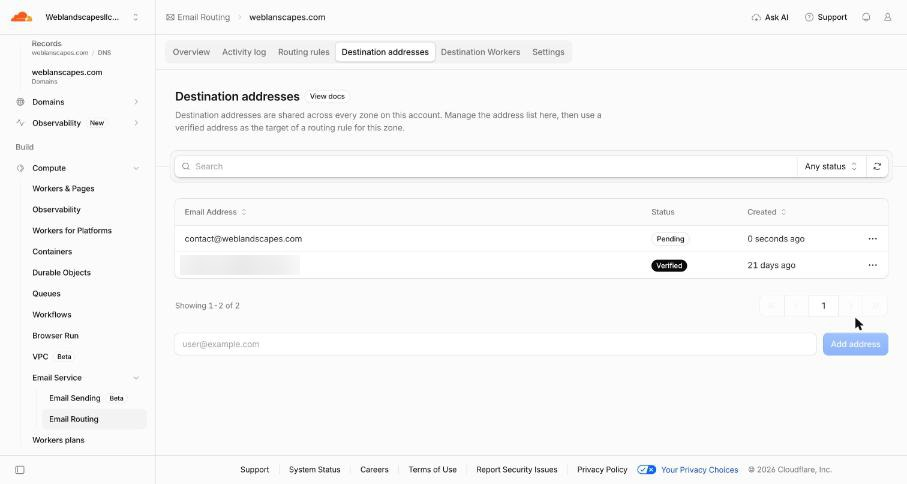
Verify it
Cloudflare sends an email to that inbox. Open it and click Verify email address. If it isn't there within five minutes, look in Spam or Junk, and in Gmail's Promotions and Updates tabs. You can resend it from the ... menu at the end of the address's row.
You'll know it worked whenthe status changes to Verified. Nothing is forwarded to an address until it says Verified.
Turn on the catch-all
Open the catch-all rule
Open the Routing rules tab. There's always a Catch-all row. Until you change it, its Action is Drop (mail is thrown away) and its Status is Disabled. Click the ... at the end of the row and choose to edit it.
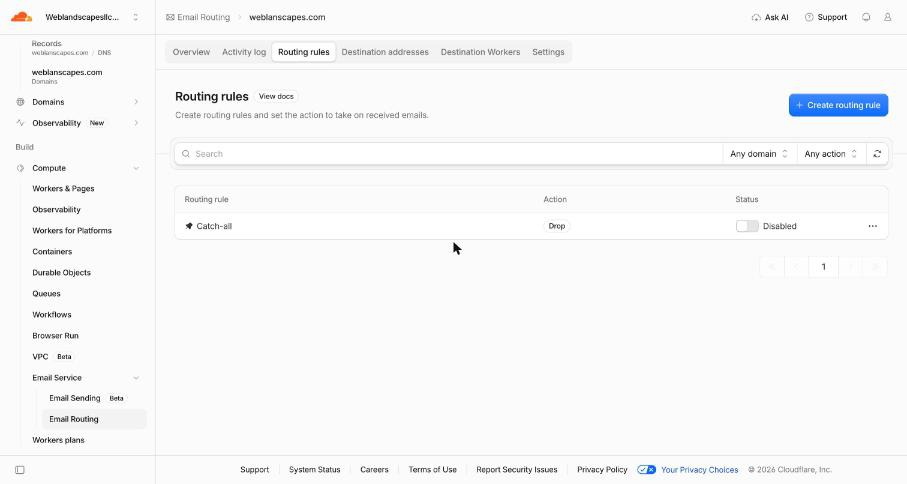
Send it to your inbox
In Edit catch-all rule, open the Action list and choose Send to an email. Click Destination, pick your verified inbox and click Save.
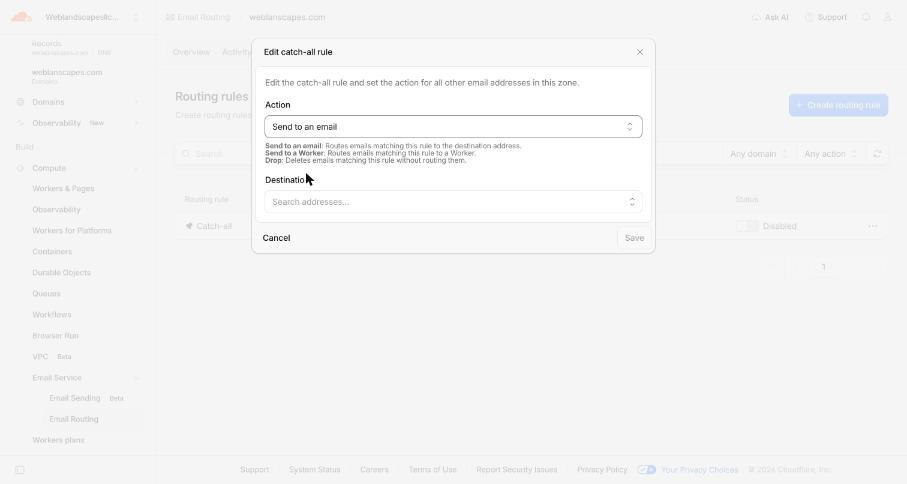
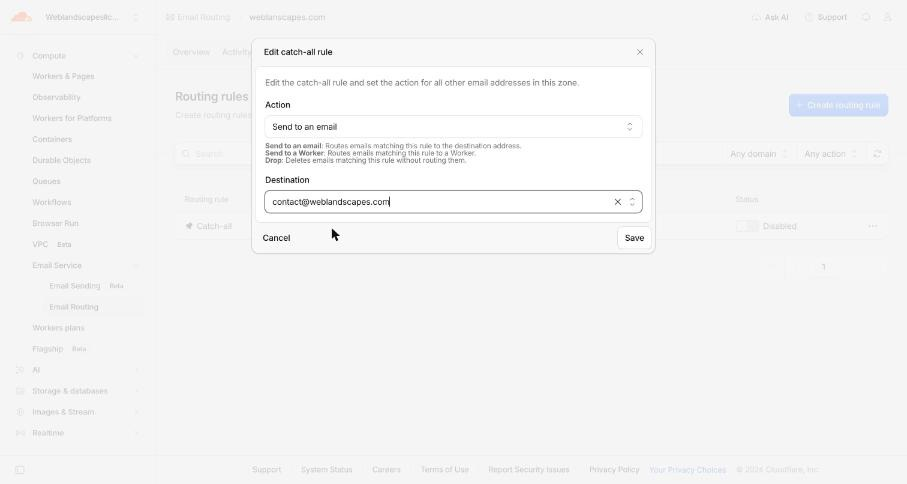
Switch it on
Back on Routing rules, turn on the Status switch so it says Active.
 You'll know it worked when
the row shows Catch-all, your inbox address and Active.
Single addresses instead
On Routing rules, click Create routing rule. In Custom address, type the part before the @ (for example
info). Set Action to Send to an email, pick your verified inbox in Destination and click Save. Repeat for each address. Leave the catch-all Disabled so other names bounce.
Test it
Send from another account
From your phone, from any email account other than the one you forward to, write to a made-up address at your domain, such as
test-today@followed by your domain. Gmail hides a message that comes back to the account that sent it, so a test from your own inbox looks like a failure when it isn't.Check it arrived
Within a few minutes it should be in your inbox. Check Spam too; if it's there, mark it Not spam so the next ones land in your inbox. If nothing arrives, open the Activity log tab in Email Routing: each message shows whether it was forwarded, dropped or rejected, and why.
Spam from the catch-all
A catch-all accepts mail for every made-up name, so spammers who guess addresses (admin@, billing@, random names) get through. If spam builds up, create a single-address rule for each address you really use, then turn the catch-all's Status off. Mail to names without their own rule then bounces.
If something goes wrong
The verification email never came
Check Spam, Junk, Promotions and Updates. Resend it from the ... menu on the address's row. If the address has a typo, delete the row and add it again.
The status stays Pending
The link wasn't clicked, or you clicked one in an older email. Resend it and click the newest one.
Mail to your domain bounces
Check that the catch-all (or the single address) is Active and sends to a Verified address, and that Settings shows no record as Missing.
The records still say Missing
Wait a few minutes and click Refresh. If they stay missing, check that your domain says Active in Cloudflare.
Cloudflare says other MX records are in the way
Your domain already has email. Stop before you remove anything; that mailbox would stop getting mail.
You want to send as your domain later
Turn forwarding off first (Settings > Disable), because forwarding and a business mailbox can't run on the same domain, then follow Set up business email with Google Workspace.
Printable checklist
Tick each box as you go. The PDF has the same list on paper.
Want us to do it for you?
We check what your domain does with email today, set up forwarding or a full business mailbox, and test it with you. Your accounts stay in your name.
Business email setup $200
See the service: Business email, domains and DNSBook a free call
The full guide as a PDF
The same steps as a printable PDF in English and Spanish, with every screenshot in order and a one-page checklist.
Free, no sign-up. The files are in English.
Official help
Web Landscapes is not affiliated with, sponsored or endorsed by Cloudflare. Product names and logos are trademarks of their owners, used here only to describe their products.
Next guideGet your site on Google with Search Console and a sitemap →