


Web Landscapes Guides Google Workspace email
Set up business email with Google Workspace
Email at your own domain, like you@yourbusiness.com, in Gmail. This guide goes from sign-up to the first test message, including the records that keep your mail out of spam.
- Time
- About 1 hour, plus up to a day for DNS
- You'll need
- Your domain's DNS login, a card for Google, and a quiet hour
- The result
- Mail to every address you use arrives in Gmail, and your replies pass SPF, DKIM and DMARC
Before you start
- Write down how your mail works today. List every address you use (info@, billing@, your own name) and where each one goes now. Also export your DNS records: in Cloudflare, open the domain, then DNS, Records, Export. Keep both.
- Sign up in your own name, with your own card. If someone helps you, they can guide you, but you type the password and the card.
- Have your DNS login ready. These steps use Cloudflare; every DNS host has the same record types under a different menu.
- Pick a quiet hour for the switch. The switch, near the end, moves mail to Google. Do it outside your busy hours, never on a Friday afternoon.
Never set up business email by upgrading a personal Gmail account. A business mailbox should be its own new account, so it can be handed over or shared later without your personal mail.
Words you'll see
| Word | What it means |
|---|---|
| Admin console | admin.google.com, where you manage the Workspace account. |
| User | One paid mailbox, for example you@. |
| Alias | An extra address that lands in a user's mailbox, for example info@. Free, up to 30 per user. |
| Group | A free address that sends mail to its members, including people outside your business. |
| Catch-all | A rule that sends mail for any address that doesn't exist to your main mailbox. |
| MX | The DNS record that says where your domain's mail is delivered. |
| SPF, DKIM, DMARC | Records that prove your mail really comes from your domain. Without them, mail lands in spam. |
Sign up
Start a new account
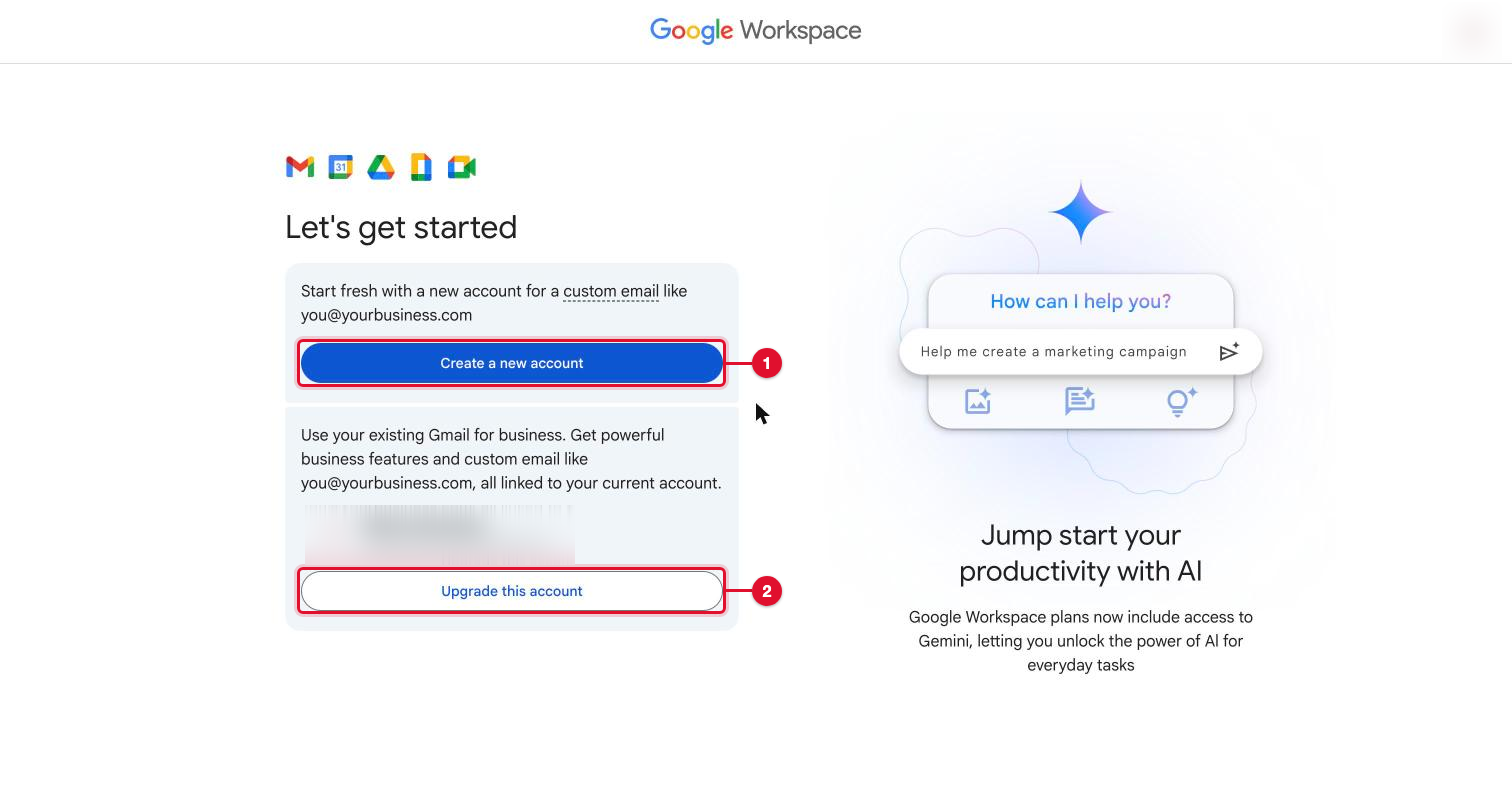
Open workspace.google.com and select Get started. Choose Create a new account. Never Upgrade this account: that turns the Gmail you're signed in to into the business account.
Enter your business and contact details
Type the business name, the number of employees and the region, then your first and last name and an email you read today. Google sends billing and recovery notices there.
Use your existing domain
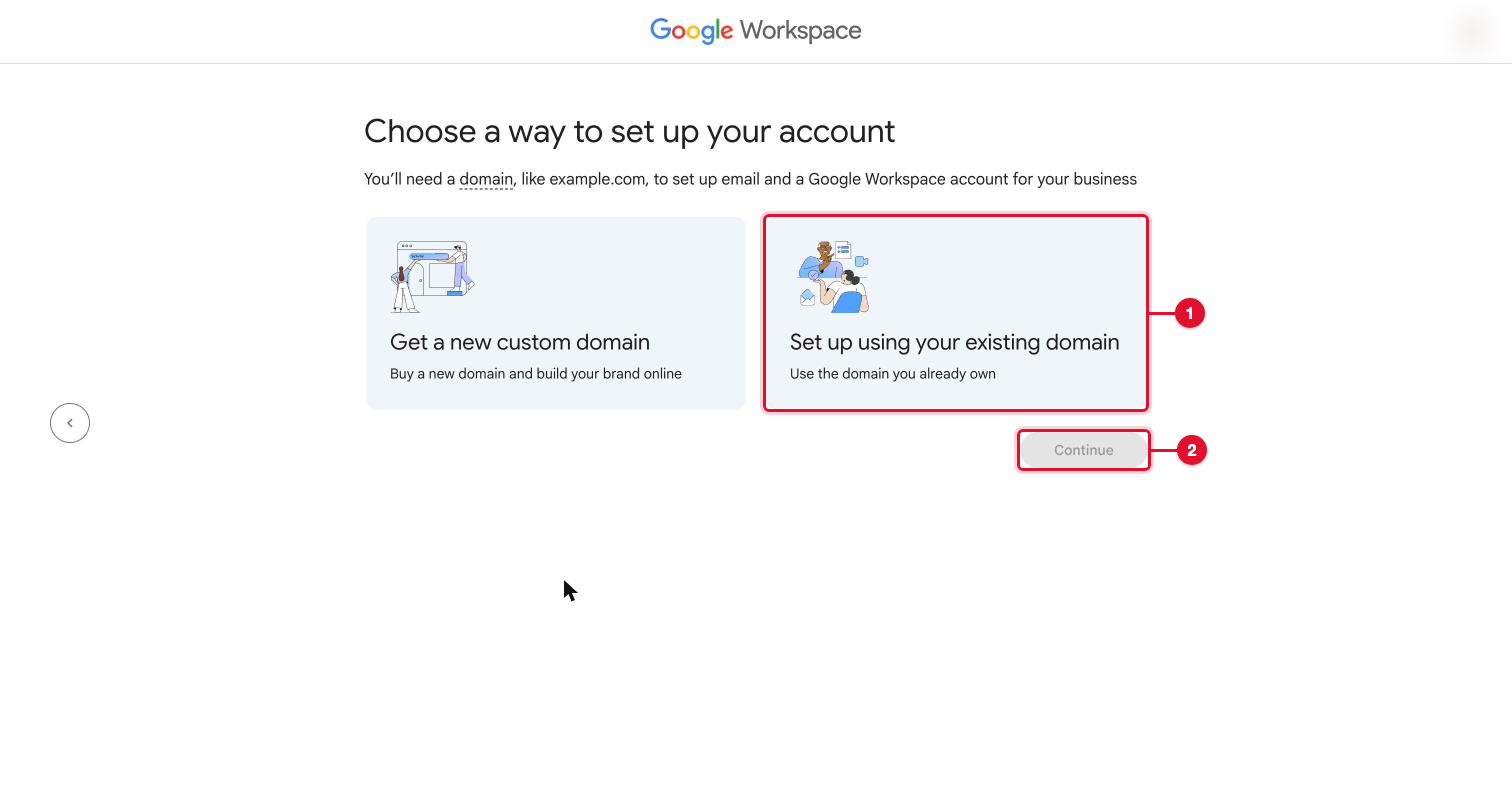
Choose Set up using your existing domain, then Continue. Type your domain and select Next. Google confirms your current email isn't affected until setup is finished.
Create your username and password
Type the username for your main address (for
you@yourbusiness.com, typeyou), then a password from your password manager, twice. Select Agree and continue.You'll know it worked whenGoogle moves on to the plans.
Choose the plan
Compare the plans
Google often shows a higher plan first. Look for the link to compare plans. Prices change and differ by country, so check the current monthly and annual prices on Google's plans page before you pick.
Pick Business Starter unless you need more
For most small businesses, Business Starter with one user is enough: extra addresses are free aliases and groups, not extra users. Choose more users only for people who need their own inbox and login.
Check out
Check the plan, the number of users and the order summary, and enter your card. Read the cancellation terms: there's usually a free trial, but on an annual plan, canceling after the trial can still mean paying for the rest of the year.
You'll know it worked whenGoogle opens Domain setup.
Verify your domain
This proves you own the domain. It doesn't change your email yet.
Choose your domain host
Under Domain host, choose your DNS host (for example Cloudflare) and select Continue.
Choose to add the record yourself
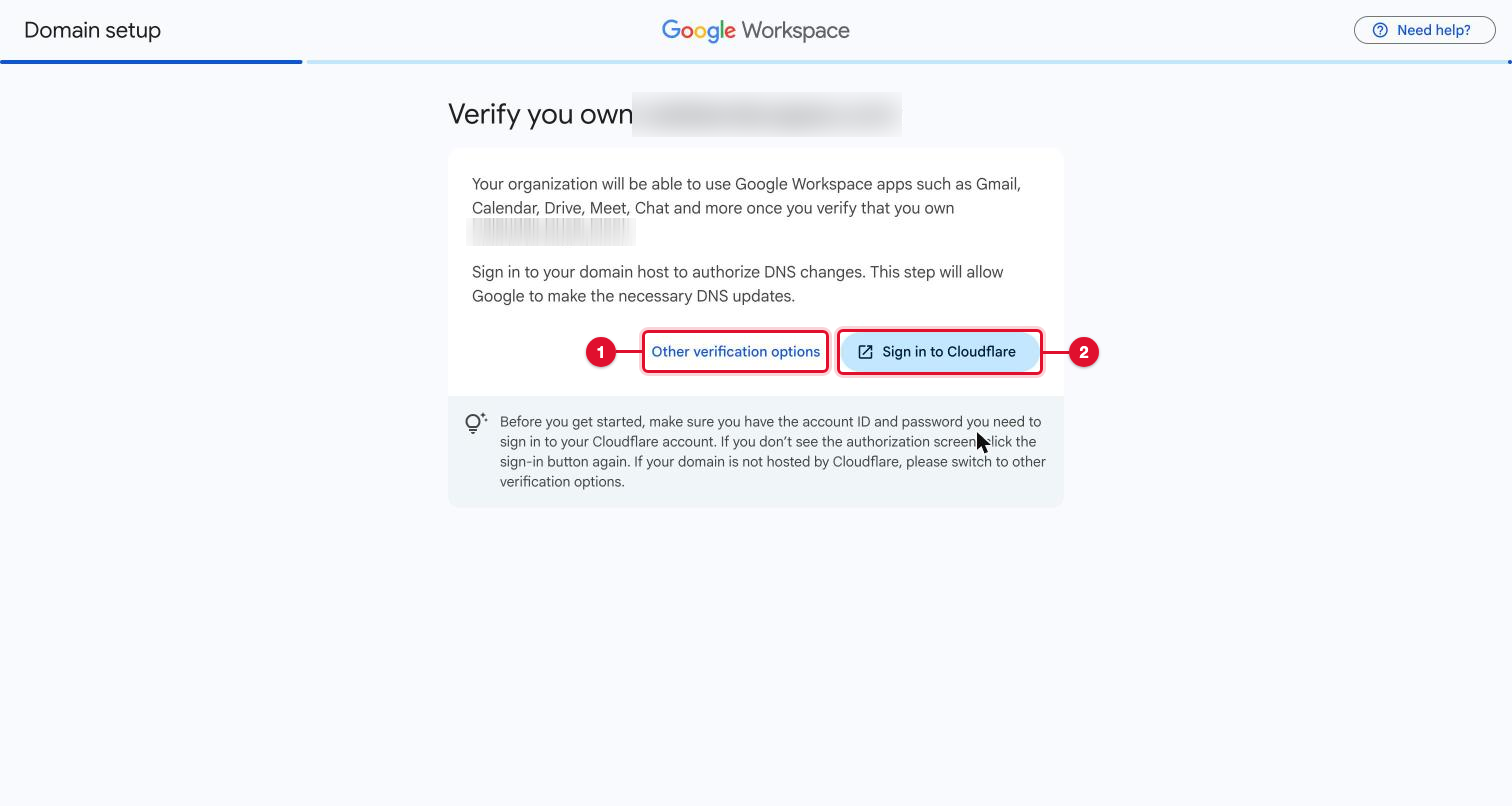
Select Other verification options rather than signing in to your DNS host from Google. Adding the record yourself means you see exactly what changes.
Add the TXT record
Copy the record's content (it starts with
google-site-verification=). In Cloudflare, open your domain, then DNS, Records, Add record. Type TXT, Name@, Content the code. Select Save.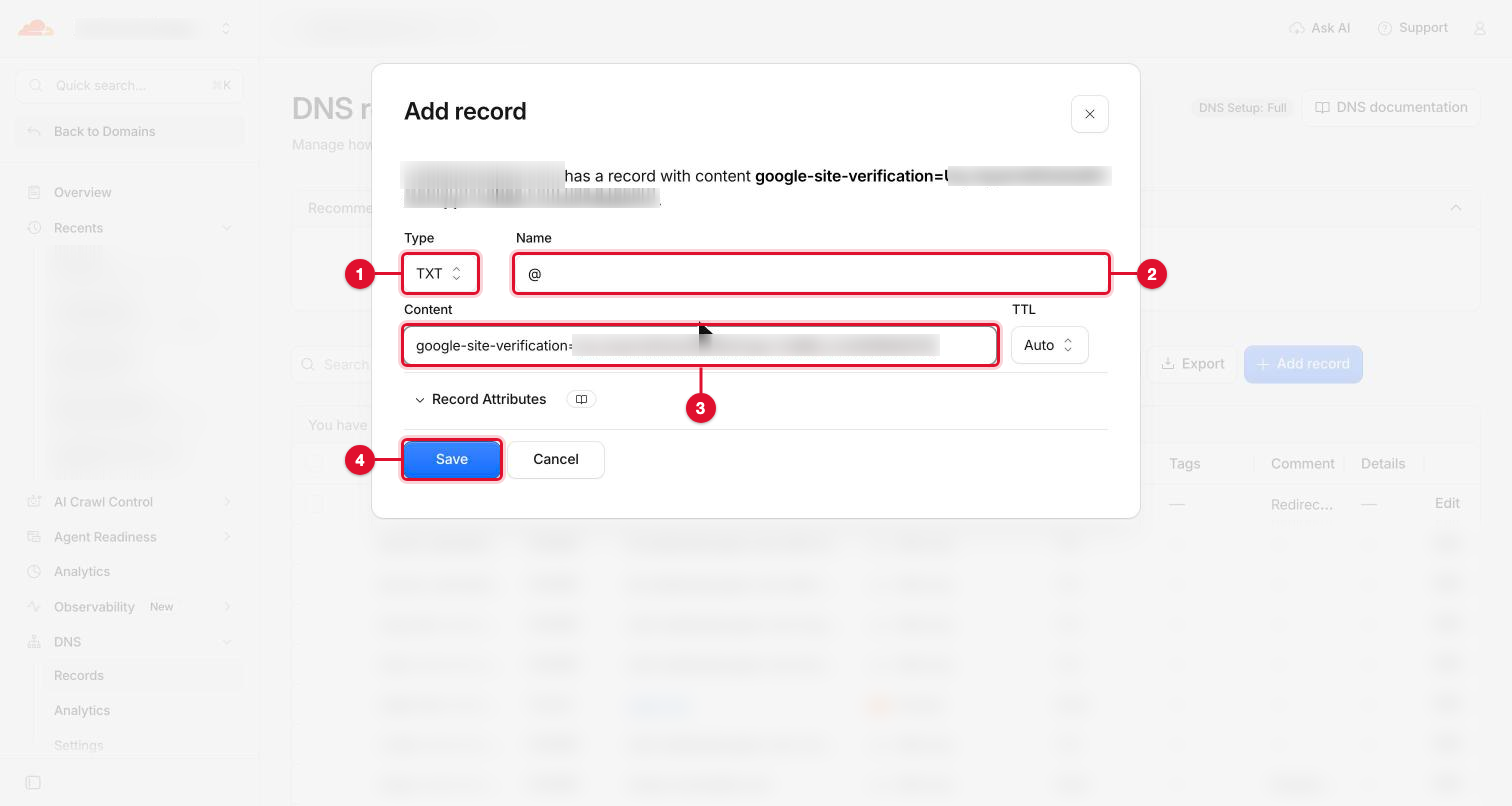
Confirm in Google
Back in Google, tick the box and select Confirm.
You'll know it worked whenGoogle says Your domain is verified! Don't select Activate Gmail yet: that's the switch, which comes later.
Keep every address you use
Every address you use today needs a home in Workspace before the switch, or mail to it will bounce.
Add aliases
In admin.google.com, open Users and select your user. Select ADD ALTERNATE EMAILS, type each address before the @ (for example
info,billing,hello), and select SAVE.You'll know it worked whenthe aliases are listed under Alternate email addresses.
Send an address to someone's own inbox
For someone who should get mail at a business address without a paid mailbox, create a free group. Open Directory, then Groups, then Create group. Give it a name and an address, and add yourself as owner. Under Who can post, tick External, so people outside your business can email it. Then open the group, select ADD MEMBERS and add the person's own address.
Catch mail sent to any other address (optional)
Only if you had a catch-all before. Open Apps, Google Workspace, Gmail, Default routing, then CONFIGURE. Change Single recipient to All recipients, keep Modify message, tick Change envelope recipient and type your main address. Under Options, choose Perform this action only on non-recognized addresses and select SAVE.
TipA catch-all also collects spam sent to made-up addresses. If you didn't rely on one before, leave it off.
The switch
This step moves your mail to Google. Do it in your quiet hour.
Remove the old mail records
If your mail runs through Cloudflare Email Routing, open the domain's Email Routing, then Settings, and select Disable: Cloudflare removes its MX records. If your mail was with another provider, delete its MX records in DNS, Records (you saved a copy in your export).
Add Google's MX record
Right away, in DNS, Records, select Add record: Type MX, Name
@, Mail serversmtp.google.com, Priority1. Select Save.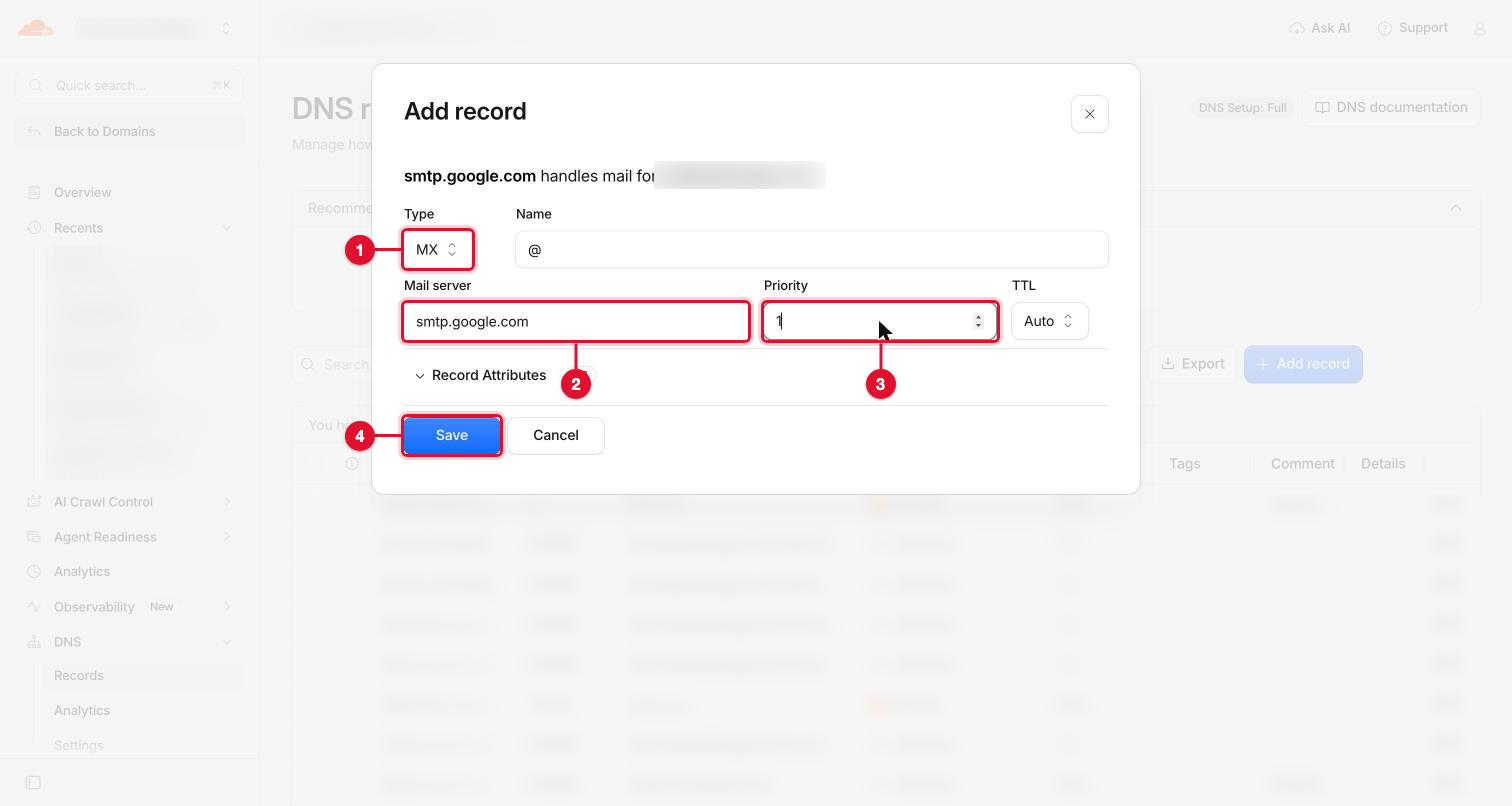
Fix the SPF record
Edit the TXT record on
@that starts withv=spf1, or add one if there isn't any. Put Google in it:v=spf1 include:_spf.google.com ~allIf the record already lists other services that send mail for you, keep their
include:parts in the same line, before~all. There must be only one SPF record. Leave other senders' DKIM records and any DMARC record as they are.Turn on Gmail
Open Gmail signed in as your new address. Find Turn on Gmail (marked Required), select Start setup and follow it to the end.
 You'll know it worked when
Google says Gmail is ready. New mail can take a few minutes, sometimes up to 24 hours, to start arriving.
Turn on DKIM
DKIM signs your outgoing mail so it doesn't land in spam. Do it right after Gmail is on.
Open Authenticate email
On Google's Gmail is activated page, find Authenticate outgoing emails and select Authenticate. Choose your domain host and Continue. Open Step 2: Add a tamper-proof seal (DKIM). Keep the 2048-bit key.
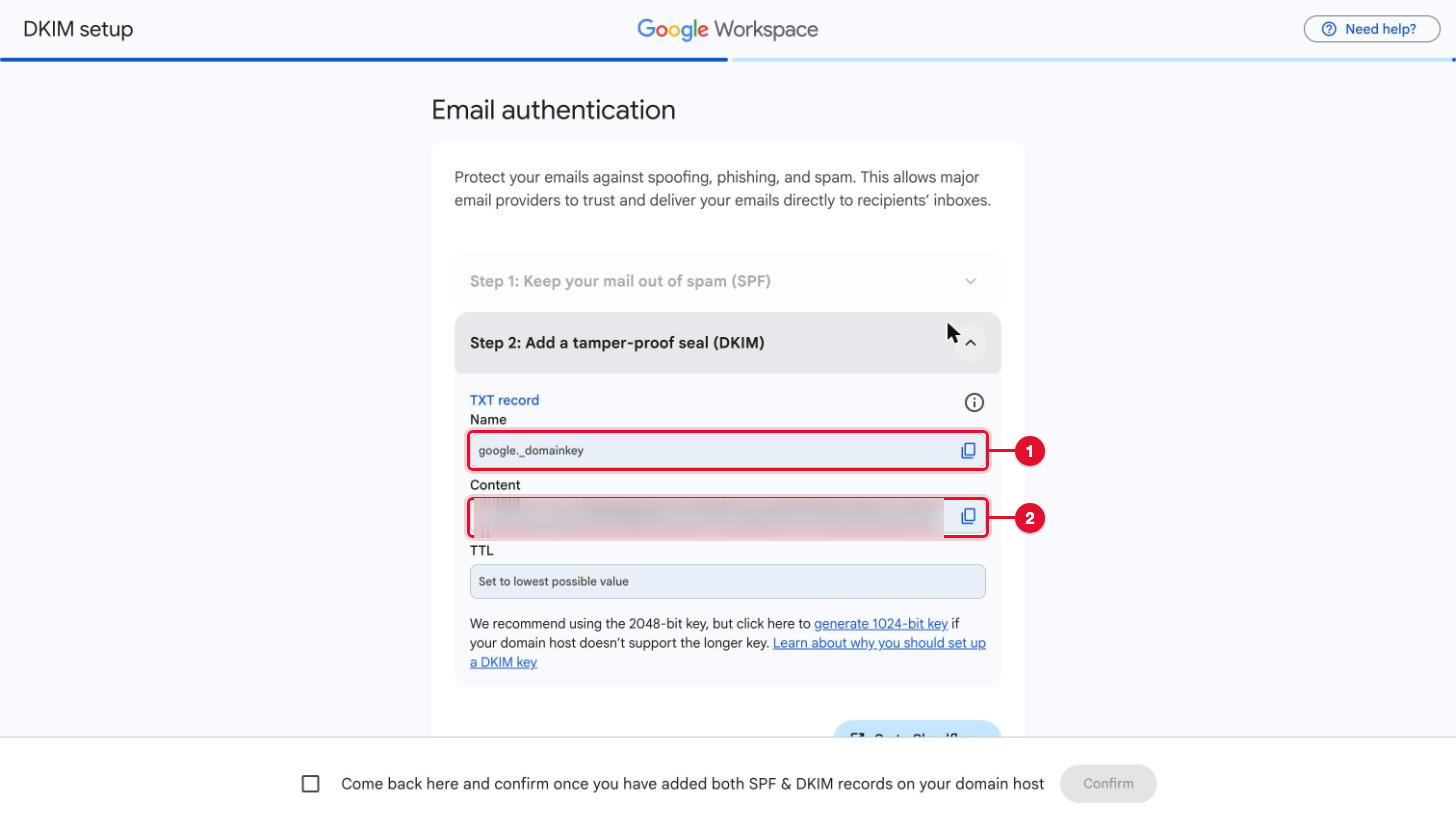
Add the DKIM record
In Cloudflare, Add record: Type TXT, Name
google._domainkey, Content pasted with Google's copy button, in one piece. Select Save.Confirm
Back in Google, tick the box that says you've added both SPF and DKIM records, and select Confirm. To check later, open the admin console, then Apps, Google Workspace, Gmail, Authenticate email.
You'll know it worked whenAuthenticate email shows Authenticating email with DKIM for your domain. DNS can take up to 48 hours to catch up.
TipSometimes Google says you must wait 24 to 72 hours after turning on Gmail before it shows the record. Come back in two days, open Authenticate email, select GENERATE NEW RECORD, add it in Cloudflare and select START AUTHENTICATION.
Add DMARC
DMARC tells other mail servers what to do with mail that claims to be from your domain but fails SPF and DKIM, and sends you reports.
Look for an existing record
In Cloudflare, search your DNS records for
_dmarc. If one exists, keep it: a domain may only have one DMARC record.Add one in report-only mode
If there isn't one, Add record: Type TXT, Name
_dmarc, Contentv=DMARC1; p=none; rua=mailto:you@yourbusiness.com.p=noneonly collects reports; nothing is blocked yet.Tighten it later
After about four weeks, read the reports. If every service that sends for you passes, change
p=nonetop=quarantine. Never tighten it before every sender passes, or your own mail lands in spam.
Check it all works
Check the records from outside
Use a public DNS checker such as mxtoolbox.com, or Terminal:
dig MX yourbusiness.com +shortshould show1 smtp.google.com., anddig TXT yourbusiness.com +shortonev=spf1line.Send test messages
From an outside address (a personal Gmail is fine), send one test to your main address, one alias, each group, and a made-up address if you set up a catch-all. Check each arrived where it should.
Check a reply
Reply from your new address to the outside one. Open the reply, select the three dots, then Show original. SPF, DKIM and DMARC should say PASS.
You'll know it worked whenevery test arrived in the right place, and the reply passes SPF and DMARC. DKIM may need a day.
Set up your phone
On iPhone, open Settings, Mail, Accounts, Add Account, Google, and sign in with your new address. On Android, add it as a Google account. Don't add it through another provider as a "send as" address: that mail fails SPF and DKIM.
If something goes wrong
No mail arrives after an hour
Check there's exactly one MX record, smtp.google.com with priority 1, and that the old provider's MX records are gone. Check Gmail setup finished with Gmail is ready.
One address bounces
It isn't a user, an alias or a group yet. Add it, or check the catch-all rule.
Your sent mail lands in spam
Check your single SPF record includes _spf.google.com, and check DKIM shows Authenticating. If DMARC was set to quarantine or reject, set it back to p=none while you fix it.
The test messages went to Spam
New setups often mark the first tests as spam, more so when they come from a Gmail account named like your business. Open Spam, select the tests and select Not spam. Send the next tests from an ordinary outside mailbox.
You need to find where a message went
In the admin console, open Reporting, then Email Log Search. Search today's messages and open one: it says Delivered, Marked spam or Dropped for each recipient, with the reason.
Mail is still broken after 30 minutes and you can't see why
Roll back. Delete the Google MX record, turn your old provider back on (for Cloudflare Email Routing, enable it again and it adds its MX records), and put the old SPF record back from your export. Try again another day.
Tips
- One user plus aliases covers most small businesses. Pay for a second user only when someone needs their own login.
- Want a copy of everything in another mailbox too? In the admin console, use Gmail, Routing, with Also deliver to. Gmail's own forwarding needs the other mailbox to confirm a code first.
- Keep the DNS export from before the switch. It's your way back if anything goes wrong.
Printable checklist
Tick each box as you go. The PDF has the same list on paper.
Want us to do it for you?
We set up Google Workspace or Microsoft 365 on your domain, move your existing addresses across, and add SPF, DKIM and DMARC. The account and the bill stay in your name.
Business email setup $200
See the service: Business email, domains and DNSBook a free call
Official help
Web Landscapes is not affiliated with, sponsored or endorsed by Google, Microsoft, Cloudflare or Brevo. Product names and logos are trademarks of their owners, used here only to describe their products.
Next guideGet your site on Google with Search Console and a sitemap →