


Web Landscapes Guides Search Console and sitemaps
Get your site on Google with Search Console and a sitemap
Search Console is Google's free dashboard for one website. You prove the domain is yours, hand Google the list of your pages, and see what's indexed and what's broken. Bing has the same thing, and it takes one extra step.
- Time
- About 30 minutes the first time, then 10 minutes a month
- You'll need
- Your live site at https://, and a login to wherever your domain's DNS lives
- The result
- Your site verified in Google and Bing, the sitemap read with a Success status, and a monthly check you can repeat
What you're setting up
A site can be finished and still get no visitors from search, because Google hasn't found it yet or doesn't know you own it. Three things fix that:
- Google Search Console at search.google.com/search-console. You prove you own the domain, hand Google your list of pages, ask it to look at new ones, and see what's indexed, what people searched for and what's broken.
- The sitemap, a file at yourbusiness.com/sitemap.xml that lists every page you want found.
- Bing Webmaster Tools at bing.com/webmasters. The same for Bing, which also feeds DuckDuckGo, Yahoo and several AI assistants.
Words in bold are the exact words on the screen. Google and Bing change their screens now and then; if yours looks different, look for the closest word.
Before you start
Google judges the site the first time it visits, so check these first:
Our free sitemap checker and SEO checker test these for you.
If your site's own code already forces https, switching on Always Use HTTPS too can cause a "too many redirects" loop. After you switch it on, open the http address in a private window and make sure the page loads.
What a good sitemap looks like
Most website builders and platforms make the sitemap for you. Open it in a browser and read it. A small one looks like this:
<url><loc>https://yourbusiness.com/services/</loc></url>
The rules it should follow:
- Full addresses that start with https://, written exactly like the page's own canonical address. If the page lives at /about/, the sitemap says /about/, not /about or /about.html.
- Only pages that load and that you want in search. Never a "page not found", a thank-you page, a login page, anything with noindex, or an address that redirects.
- A site in two languages lists both versions.
- A
<lastmod>date only if it's the real date the page changed. Made-up dates teach Google to ignore them. - robots.txt names the sitemap on its own line:
Sitemap: https://yourbusiness.com/sitemap.xml
Add and verify your site in Google
Open Search Console and add a property
Go to search.google.com/search-console and sign in with the Google account the business will keep, not someone's personal account that may leave. Open the property menu at the top left, select Add property at the bottom of the list, then Add a website.
Choose Domain and type the bare domain
Use the left box, Domain. Type only
yourbusiness.com: no https, no www, no slash (number 4 in the picture). Select Continue (number 5). A Domain property covers http, https, www and every subdomain in one place.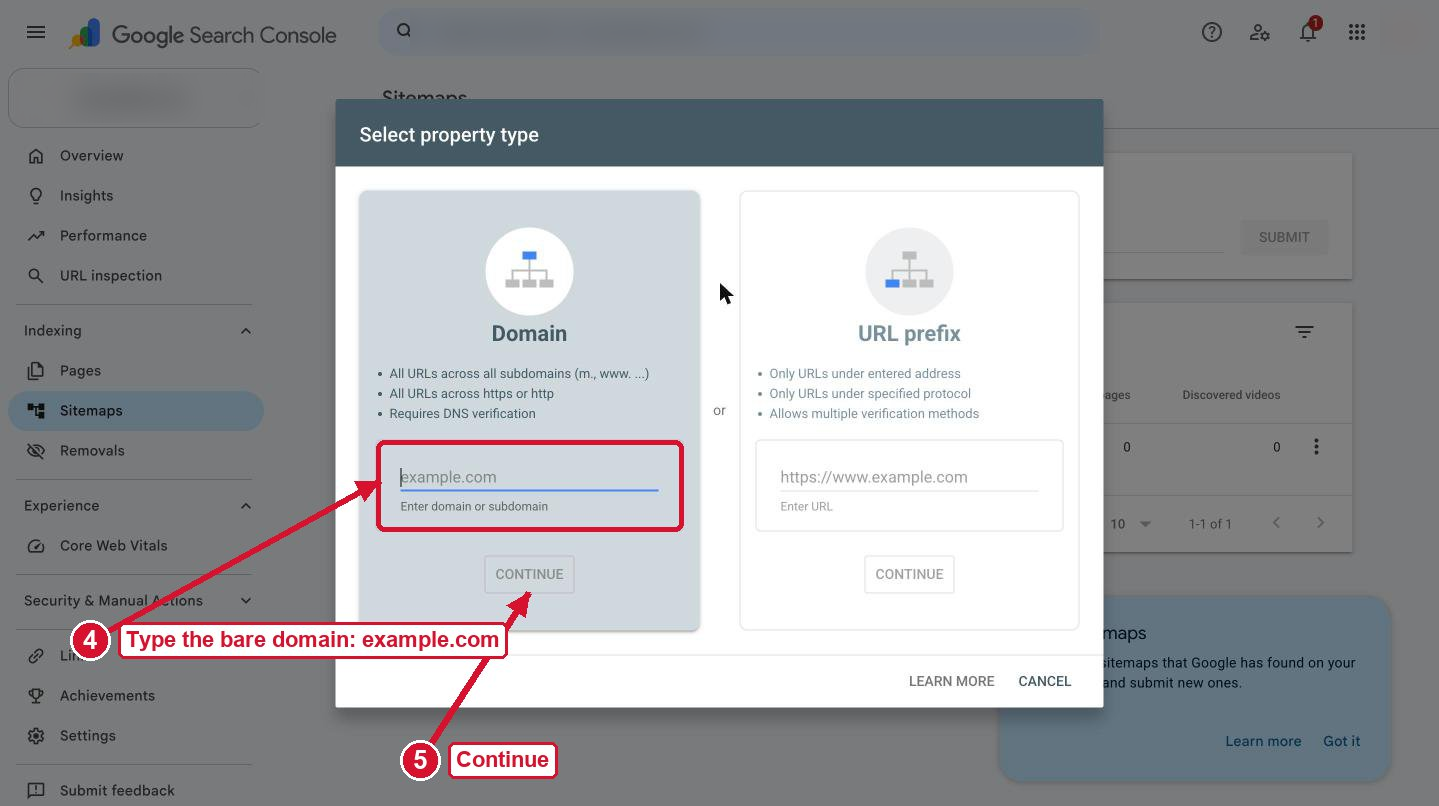
Start the verification
Google shows a TXT record to add to your domain's DNS. If your DNS is on Cloudflare, Instructions for shows Cloudflare.com (number 6). Select Start verification (number 7) and a Cloudflare tab opens.
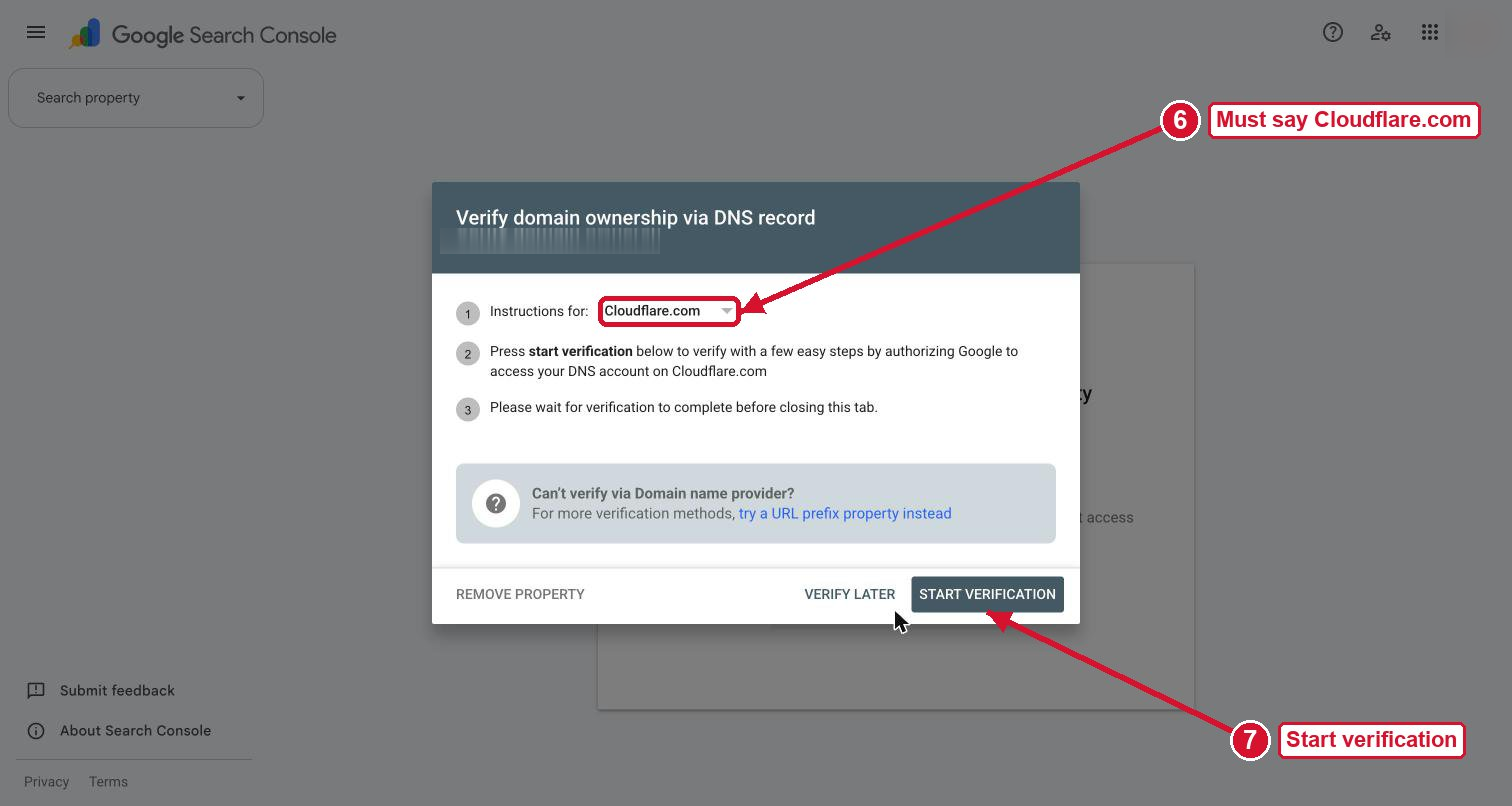
If your DNS is somewhere else, choose Any DNS provider, copy the TXT value, and add it at your DNS host as a TXT record on
@. Then come back and select Verify.Authorize the record in Cloudflare
In the Cloudflare tab, check it names your domain (number 8). There must be exactly one record: a TXT whose content starts with
google-site-verification=(number 9). Select Authorize (number 10). It's a one-time change; Google gets no ongoing access to your account. You'll know it worked when
back in Search Console you see Verifying for a few seconds, then Ownership verified. Select Done.
ImportantNever delete a
google-site-verificationTXT record later, even if it looks like clutter. Deleting it un-verifies the site and you lose access to its data.
Submit the sitemap to Google
Open Sitemaps
Check the right site is selected at the top left. In the left menu, open Indexing, then Sitemaps (number 1).
Type the full address and select Submit
Under Add a new sitemap, type the full address,
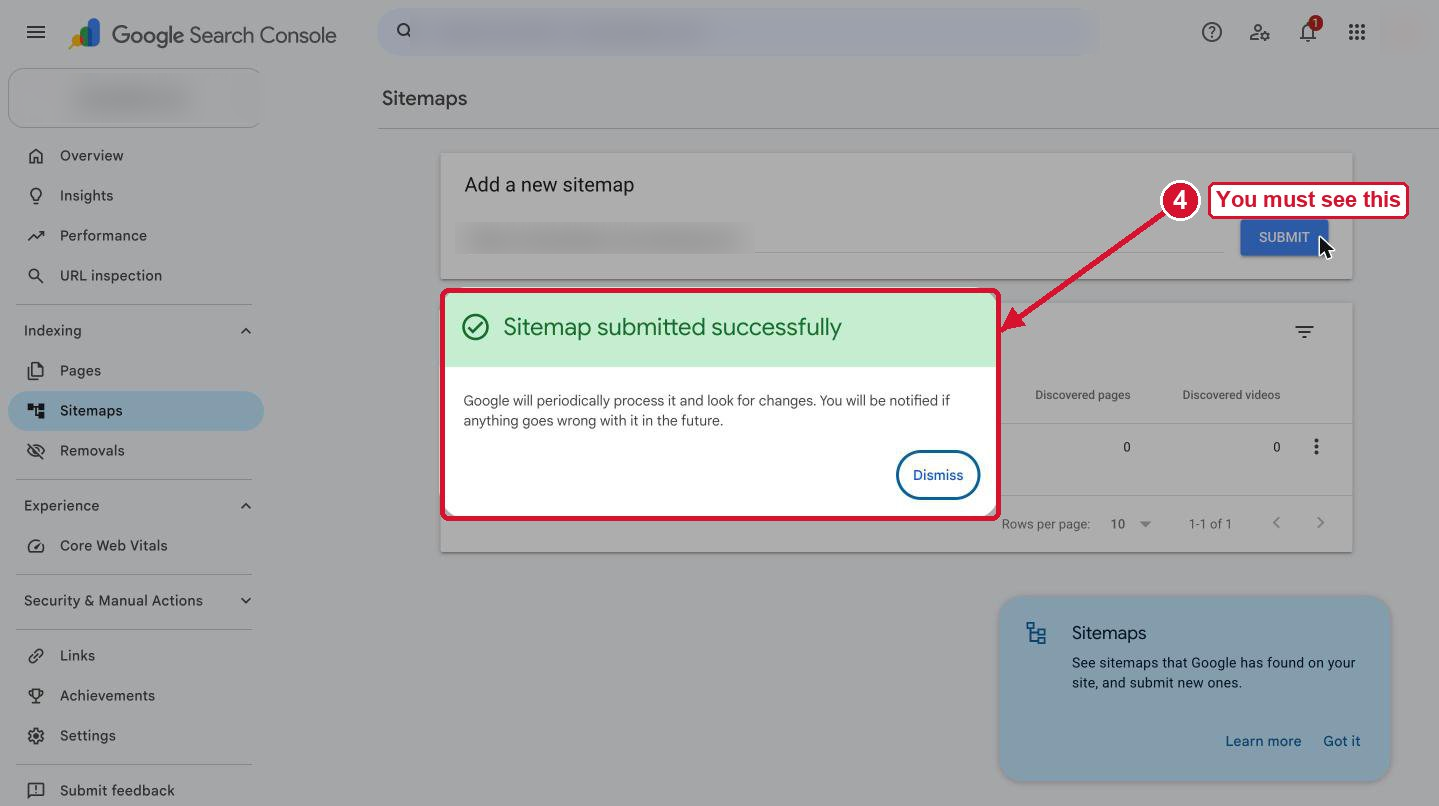
https://yourbusiness.com/sitemap.xml(number 2). Select Submit (number 3). Pressing Enter does nothing; you have to select the button. You'll know it worked when
you see Sitemap submitted successfully (number 4). No message means it wasn't submitted.
Read the status the next day
Right after submitting, the status often says Couldn't fetch. That's normal on day one. Look again the next day:
Status What it means What to do Couldn't fetch Normal on the first day Check tomorrow. Still there? Open the sitemap address yourself: it must load as a list of pages, not an error Success Google read it and counted the pages The count of discovered pages should match your site. Lower means pages are missing from the sitemap Has errors Bad addresses or a broken file Select it to see which. Usually http addresses, the wrong domain, or a stray & that should be written &
Ask Google to look at your main pages
Inspect the page
Paste the page's full address into the search bar at the very top of Search Console and press Enter (number 1). URL is not on Google is normal for a new page.
Request indexing
Select Request indexing (number 3). It takes up to a minute.
 You'll know it worked when
Google says Indexing requested (number 4). The page is in a priority queue.
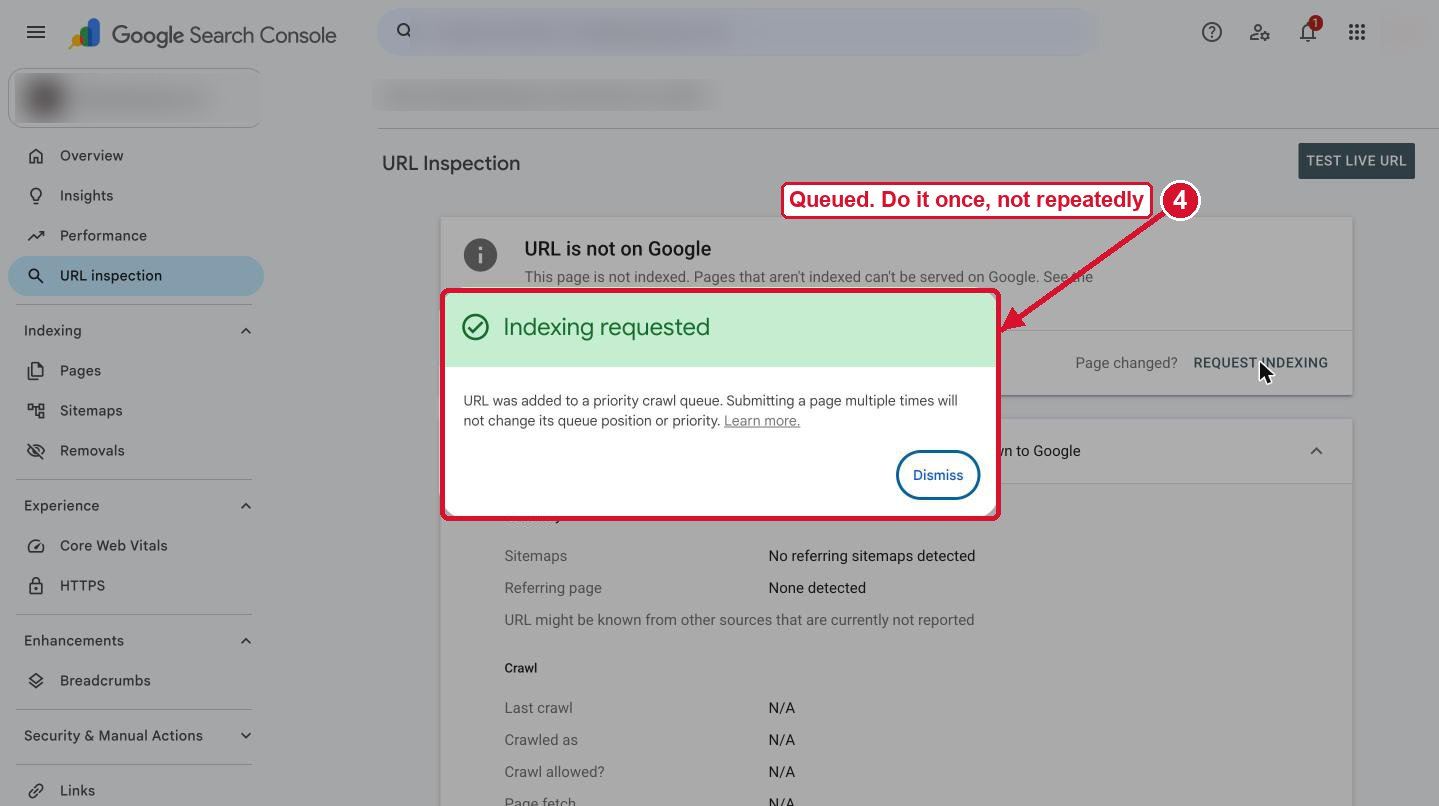
Do it for the home page and your two or three main pages, not every page. Asking twice for the same page doesn't move it up the queue, and Google limits how many requests you can make a day.
Add the site to Bing
Import from Google
Do this after the site is verified in Google. Go to bing.com/webmasters and sign in (a Google sign-in works). Open the site picker at the top left and select Add a site. Choose Import under Google Search Console, allow access with the same Google account, tick your site and select Import. No separate verification is needed.
If the import says Site addition unsuccessful, the site was probably verified in Google only minutes ago. Wait an hour or until the next day and import again. Adding the site by hand also works, but then Bing asks for its own DNS record.
Submit the sitemap in Bing
The import doesn't always bring the sitemap across. Pick the site at the top left, open Sitemaps in the left menu, select Submit sitemap, type the full address and select Submit.
You'll know it worked whena green success message appears and the sitemap shows in the list. Processing for a day or two is normal.
When your site changes
The sitemap should always equal every page you want found, at its final address. After any change, open /sitemap.xml in a browser and read it.
| What changed | Sitemap | Bing | |
|---|---|---|---|
| Text, photos or prices on a page | Nothing to change | Request indexing if it matters (a new offer, wrong information fixed) | URL Submission |
| A new page | Must list it | Request indexing for the new page | URL Submission |
| A page removed | Must drop it. The page should answer "not found", or redirect to the closest page | Nothing | Nothing |
| A page renamed | New address in, old one out | Redirect old to new, then request indexing for the new one | URL Submission of the new one |
| Whole site on a new domain | The new domain's sitemap | Verify the new domain, then use Change of address in the old property's Settings | Add the new site and use Site Move |
You don't need to resubmit the sitemap when pages change: the address stays the same and Google rereads it on its own. In Bing, URL Submission takes the changed addresses, one per line.
Never point the sitemap or a page's canonical tag at an address that redirects. Google gets mixed signals and may pick the wrong one.
Your monthly check
Read Pages under Indexing
Open Indexing, then Pages. The top shows Indexed and Not indexed, and below is Why pages aren't indexed, with a count for each reason. A new property says it's processing data for a few days.
Read Performance
Open Performance. Above the chart, choose Compare and compare the last 28 days with the period before. Note Total clicks and Total impressions. Under the chart, the Queries tab shows what people searched and the Pages tab which pages they landed on.
Check the rest
You'll know it worked whenyou have this month's clicks and impressions, last month's to compare, and nothing new under Why pages aren't indexed that you can't explain.
What the Pages report means
Crawled, currently not indexed
Google saw the page and hasn't decided yet. Common on new sites. Wait two or three weeks, and add more useful content if the page is thin. A few minor pages here, like a privacy page, is normal.
Discovered, currently not indexed
Google knows the page but hasn't visited yet. Wait, and request indexing for the ones that matter.
Excluded by 'noindex' tag
The page tells Google to stay away. If you want it found, the noindex tag has to come off. Ask whoever built the site.
Page with redirect
An address that redirects is in the sitemap or linked from your pages. Change the sitemap and links to the final address.
Not found (404)
Something links to a page that's gone. Redirect it if there's a replacement; otherwise it's fine to leave.
Duplicate, Google chose different canonical than user
Two addresses show the same page. Make the canonical tag, the sitemap and your links agree on one address.
Server error (5xx)
Your site failed when Google visited. If it's on pages that should work, tell your web host the same day, with the addresses.
The Cloudflare tab is blank during verification
Wait 10 seconds. Still blank? Close it and select Start verification again; the second try usually works. If it keeps failing, use Any DNS provider and add the TXT record by hand.
Tips
- Add the site under a Google account the business owns. A site added under a personal account leaves with that person.
- To give someone access without sharing your password, open Settings, then Users and permissions, and add their email with Full or Restricted permission. Keep Owner for yourself.
- Never submit http addresses, test or staging addresses, or someone else's domain.
- When a number drops, check the date range first. Many drops are just a shorter month.
Printable checklist
Tick each box as you go. The PDF has the same list on paper.
Want us to do it for you?
We add every site we build to Search Console and Bing on launch day, keep the sitemap right when pages change, and read the reports each month. If your site already exists and isn't on Google the way it should be, we can find out why and fix it.
Official help
Web Landscapes is not affiliated with, sponsored or endorsed by Google, Microsoft or Cloudflare. Product names and logos are trademarks of their owners, used here only to describe their products.
Next guideWebsite launch checklist →