


Web Landscapes Guides GoDaddy to Cloudflare
Move your domain from GoDaddy to Cloudflare
How to move your domain's DNS to Cloudflare while your website and email keep working, and, if you want, move the registration too so it renews at Cloudflare's price.
- Time
- About 1 hour, plus up to 24 hours of waiting
- You'll need
- Your GoDaddy login, a free Cloudflare account and a quiet hour
- The result
- Cloudflare answers for your domain, your site and email work, and you have a saved copy of every record
Before you start
The move has two parts. Part 1 moves the DNS: the domain stays registered at GoDaddy, but Cloudflare answers for it. That is all most businesses need. Part 2 moves the registration itself to Cloudflare, so renewals happen there. Do Part 2 only after Part 1 has worked for a few days, and only if you want it.
- You can sign in to the GoDaddy account that holds the domain, and you have your phone nearby for GoDaddy's codes.
- You have a Cloudflare account in your own name, with two-step login turned on. Signing up at dash.cloudflare.com is free.
- You know where your email lives today: Microsoft 365, Google Workspace, GoDaddy's own email, or nothing. Email is the part that breaks if a record goes missing.
- Pick a quiet hour, not right before a weekend you'll be away. The change takes minutes; you want time to check email afterwards.
If someone helps you with this, invite them from GoDaddy's Delegate Access page and add them as a member in Cloudflare. Never share your password or read out a code GoDaddy sends you.
Words you'll see
| Word | What it means |
|---|---|
| Registrar | The company where the domain is registered and renewed. Here, GoDaddy. |
| DNS | The settings that tell the internet where your website and email live. |
| Nameservers | The two addresses that say which company answers for your DNS. Changing them is what moves the DNS. |
| Zone file | A text file with every DNS record of your domain. GoDaddy lets you download it. |
| MX | The record that says where your email is delivered. |
| SPF, DKIM | Records that prove your mail really comes from your domain. Without them, your mail lands in spam. |
| Proxied (orange cloud) | Cloudflare sits in front of the record. Right for the website, wrong for email. |
| DNS only (gray cloud) | Cloudflare just answers with the record. Every email record must be DNS only. |
| Authorization code | A password for moving the registration to another registrar. Also called the transfer or EPP code. |
Part 1: save every record
Do this first, before anything changes. It's your copy if something goes missing later.
Open the domain's DNS records
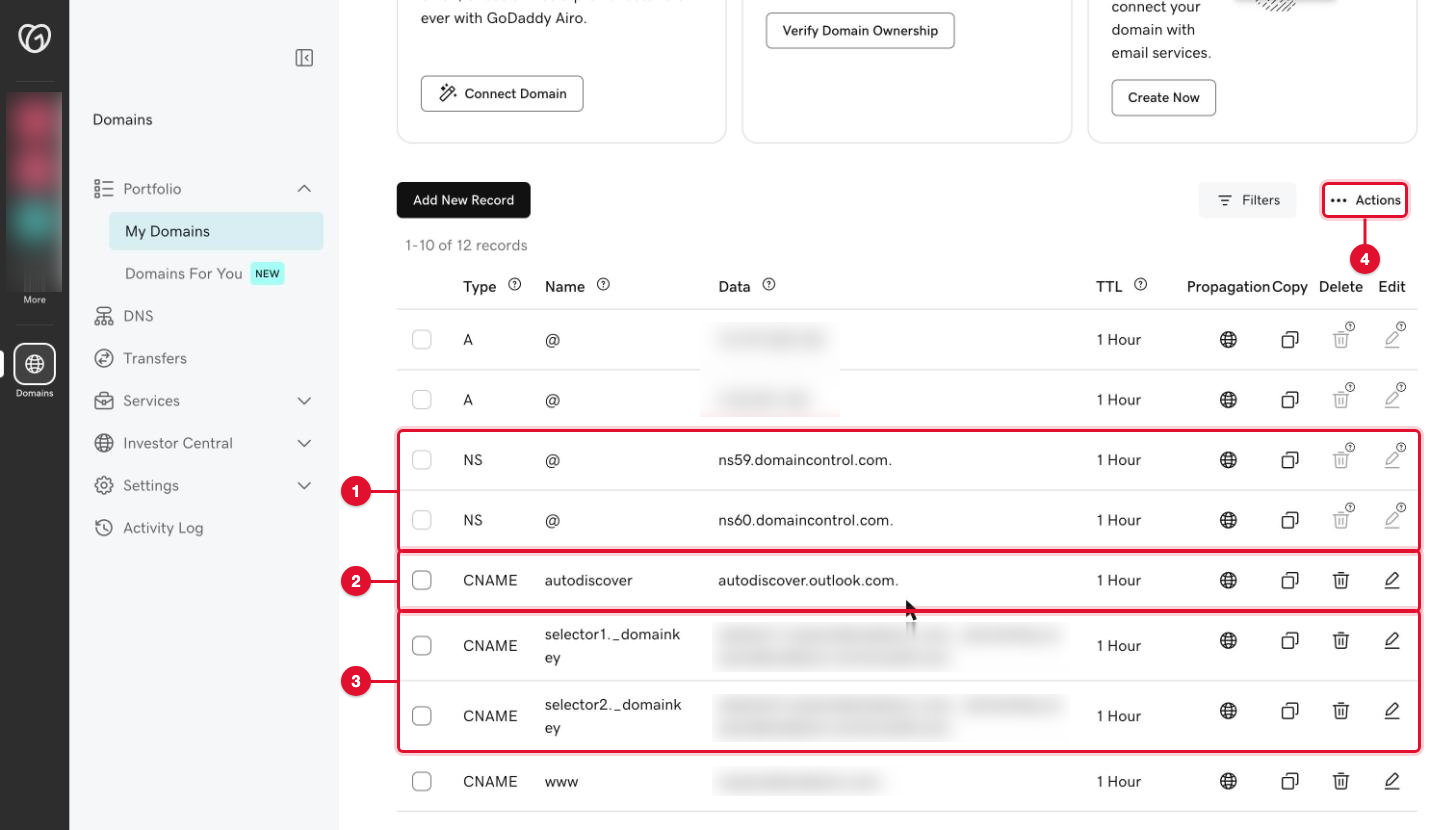
In GoDaddy, open Domain Portfolio, then My Domains, and select the domain. Select DNS, then the DNS Records tab. You see a table with Type, Name, Data and TTL.
Export the zone file
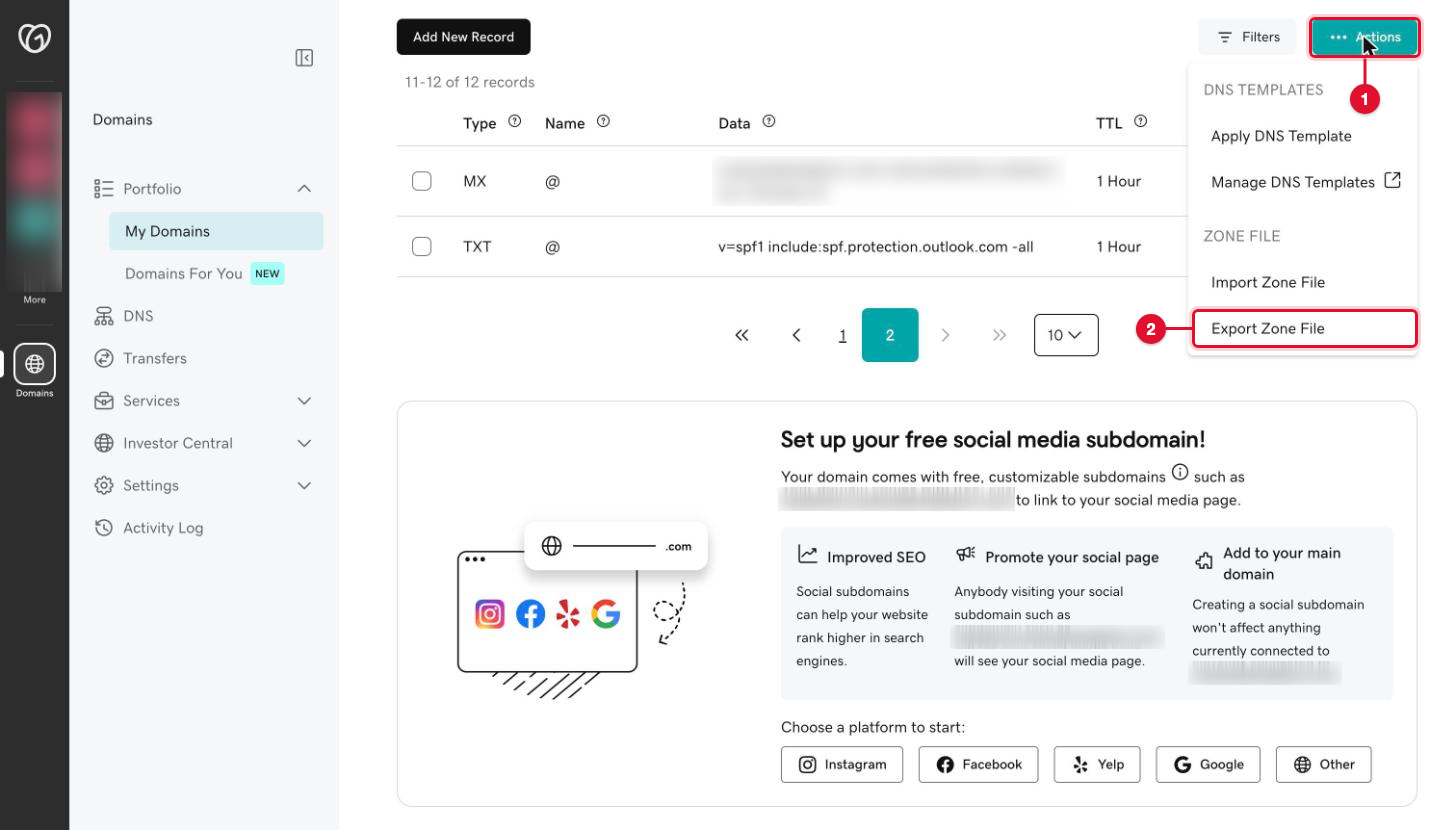
Open Actions, then Export Zone File. Save the file somewhere safe with the date in its name.
Also take a screenshot of every page of the records table. GoDaddy shows 10 records per page; use the arrows under the table.
Write down your email records
Find the email records and write each one down. For Microsoft 365 they look like this:
Record Example What breaks if it's missing MX @yourbusiness-com.mail.protection.outlook.com, priority 0No email arrives at all TXT @startingv=spf1v=spf1 include:spf.protection.outlook.com -allSent mail lands in spam or bounces CNAME selector1._domainkeyandselector2._domainkeypoint to ...onmicrosoft.comDKIM fails; sent mail lands in spam CNAME autodiscoverautodiscover.outlook.comOutlook and phones can't set up the account TXT _dmarc, if there is onev=DMARC1; p=...Mail checks get weaker Google Workspace uses the same idea with different values: an MX of
smtp.google.comand a DKIM record namedgoogle._domainkey.Check for DNSSEC
Open the DS Records tab. If it lists any records, DNSSEC is on. Turn it off at GoDaddy, then wait at least 24 hours before you change the nameservers, or the domain stops working when the nameservers change. You can turn it on again later in Cloudflare.
You'll know it worked whenyou have the zone file, the screenshots and your list of email records saved together.
Part 1: add the domain to Cloudflare
Add the domain
Sign in at dash.cloudflare.com. Open Domains and select Onboard a domain (some accounts show Add a domain). Type your domain and continue. Choose the Free plan unless you know you need another.
Compare the records line by line
Cloudflare scans your domain and lists the records it found. Compare them with your GoDaddy list:
- Every record from GoDaddy is there, with the same type, name and value. Add any that's missing with Add record.
- Leave out GoDaddy's own NS records and the
_domainconnectrecord. Cloudflare doesn't need them. - The website records (
@andwww) can stay Proxied (orange cloud). - Every email record that shows a cloud (
autodiscover, the_domainkeyrecords, anything withmailin the name) must be DNS only (gray cloud). Select the cloud to switch it. MX and TXT records have no cloud: they are always DNS only.
ImportantNever delete a record because you don't recognize it. Keep it exactly as it was at GoDaddy. It may belong to a service you forgot about.
Copy your two nameservers
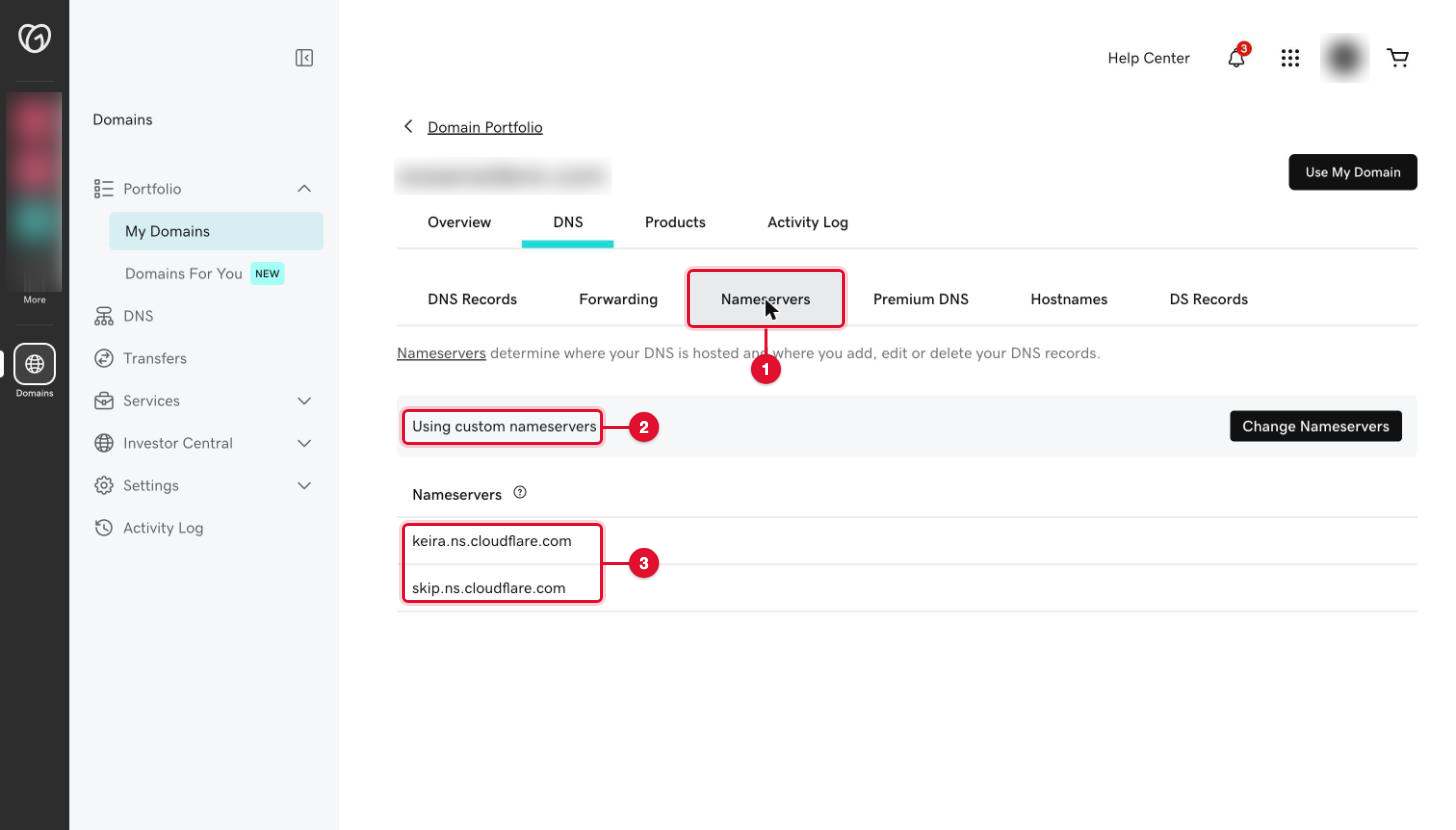
Select Continue. Cloudflare shows two nameservers for your domain, for example
keira.ns.cloudflare.comandskip.ns.cloudflare.com. Yours will be different. Copy them exactly.You'll know it worked whenCloudflare's record list matches your GoDaddy list, every email record has a gray cloud, and you have the two nameservers written down.
Part 1: change the nameservers at GoDaddy
Open Change Nameservers
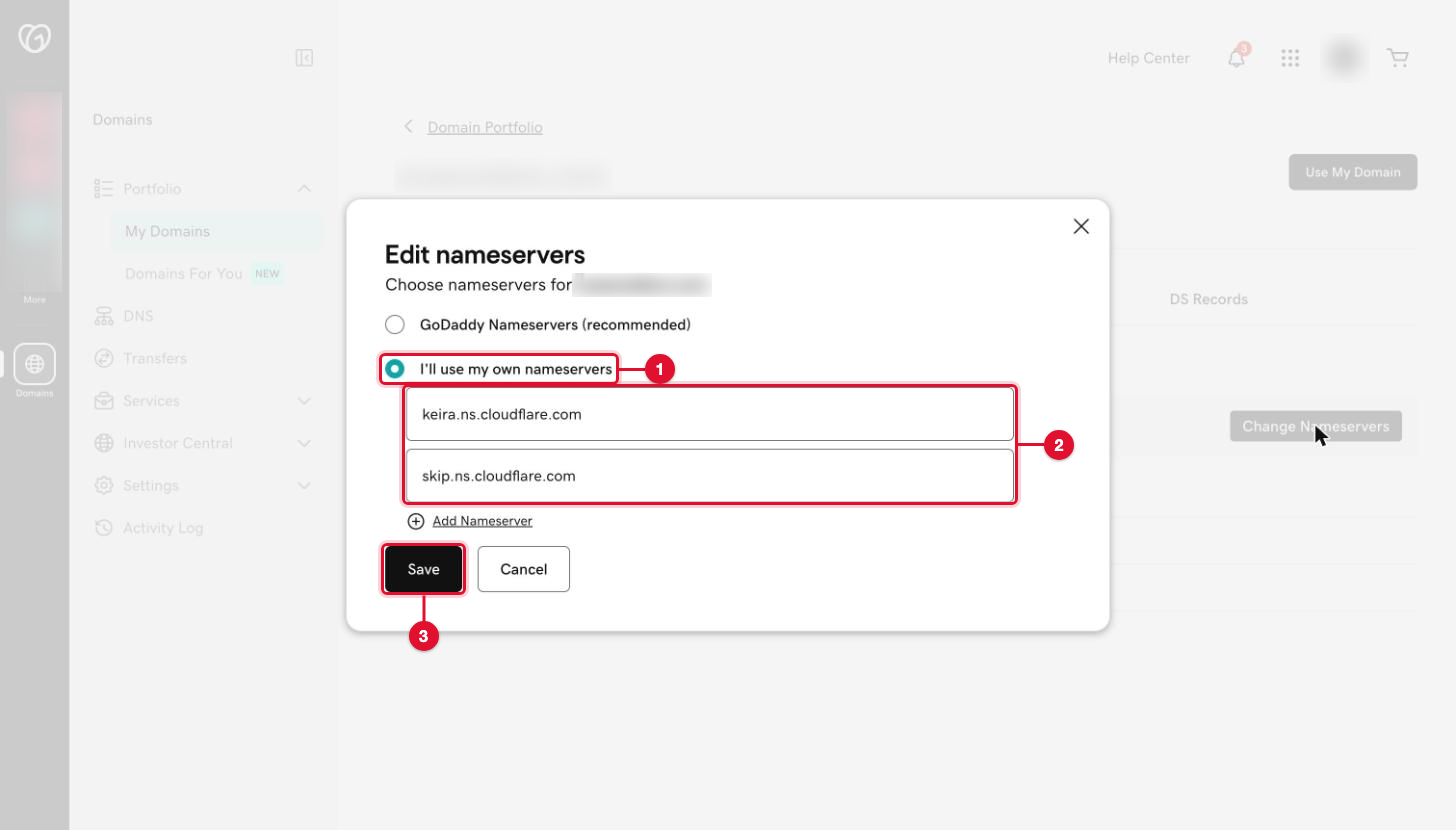
In GoDaddy, open the domain, then DNS, then the Nameservers tab, and select Change Nameservers.
Type Cloudflare's nameservers
Choose I'll use my own nameservers. Type the two Cloudflare nameservers into the two boxes, one per box, exactly as Cloudflare showed them. If there are more than two boxes, remove the extras.
Save
Select Save, then Continue if GoDaddy asks again. If GoDaddy sends you a code, type it in. Write down the time you made the change.
You'll know it worked whenthe Nameservers tab says Using custom nameservers and lists the two Cloudflare nameservers.
Part 1: wait, then check everything
Wait for Cloudflare
In Cloudflare, on the domain's overview, ask it to check the nameservers now. Cloudflare emails you when the domain is active. It's usually within a few hours and can take up to 24. Don't change anything else at GoDaddy or Cloudflare while you wait.
Check the website
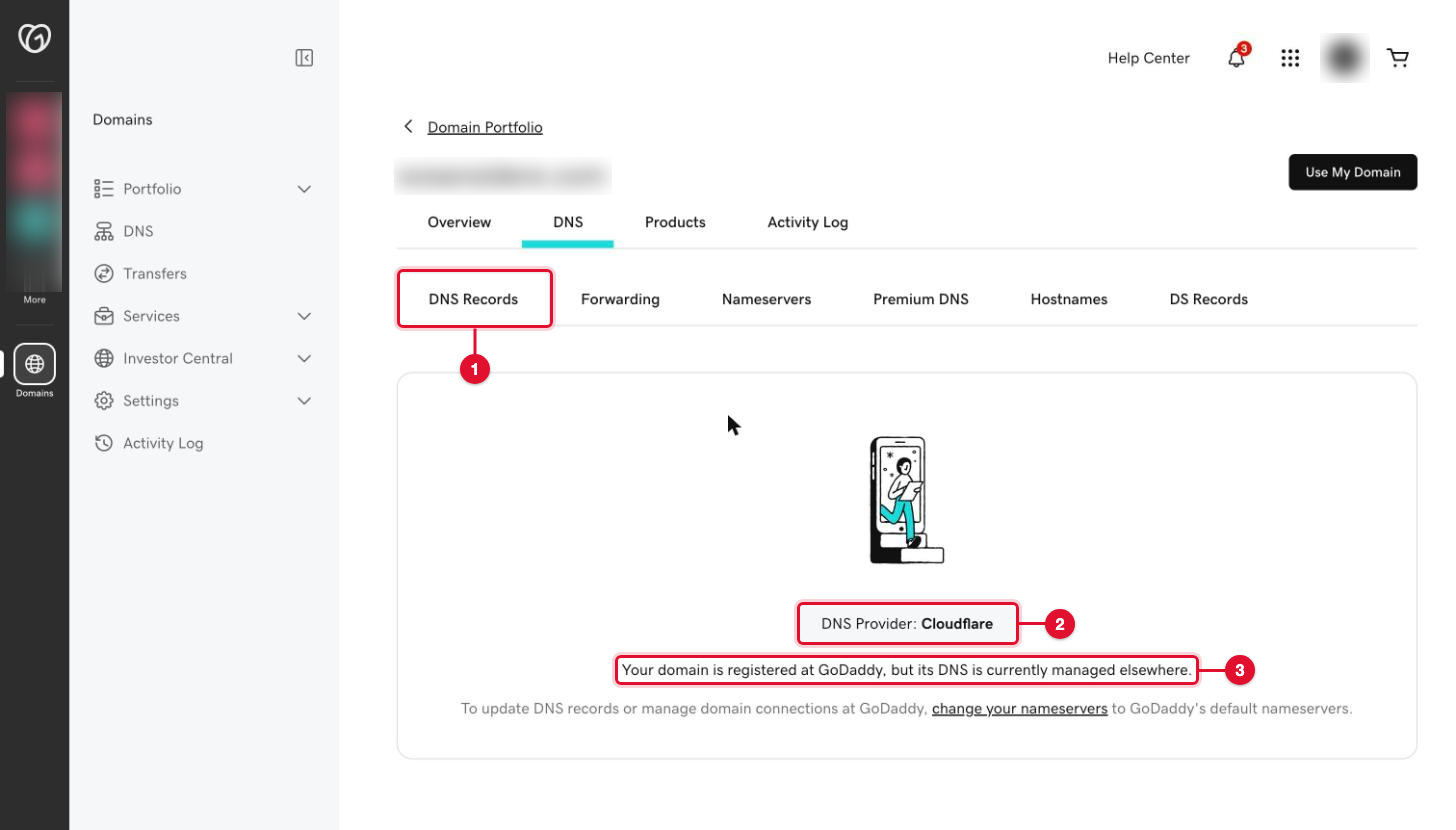
Back in GoDaddy, the DNS Records tab now says DNS Provider: Cloudflare and "Your domain is registered at GoDaddy, but its DNS is currently managed elsewhere."
Open
https://yourbusiness.comandhttps://www.yourbusiness.comon your phone using mobile data, not your office Wi-Fi. Both open, with the padlock.Check email both ways
Send an email to your business address from another account, and reply to it. Both arrive. Then send one email from your business address to a Gmail account. In Gmail, open it, select the three dots, then Show original: SPF and DKIM should say PASS.
You'll know it worked whenCloudflare shows the domain as Active, the site opens with the padlock, and email works both ways with SPF and DKIM passing.
Part 2: move the registration to Cloudflare (optional)
Do this only if you want renewals in Cloudflare, and only after Part 1 has worked for a few days. Before you start:
- The domain was registered, or last transferred, more than 60 days ago, and the owner's name or email hasn't changed in the last 60 days. Otherwise the transfer isn't allowed yet.
- The domain is Active in Cloudflare, and DNSSEC is off at GoDaddy.
- There's a card on your Cloudflare account. The transfer costs one year of renewal at Cloudflare's price and adds that year to the domain.
Unlock the domain at GoDaddy
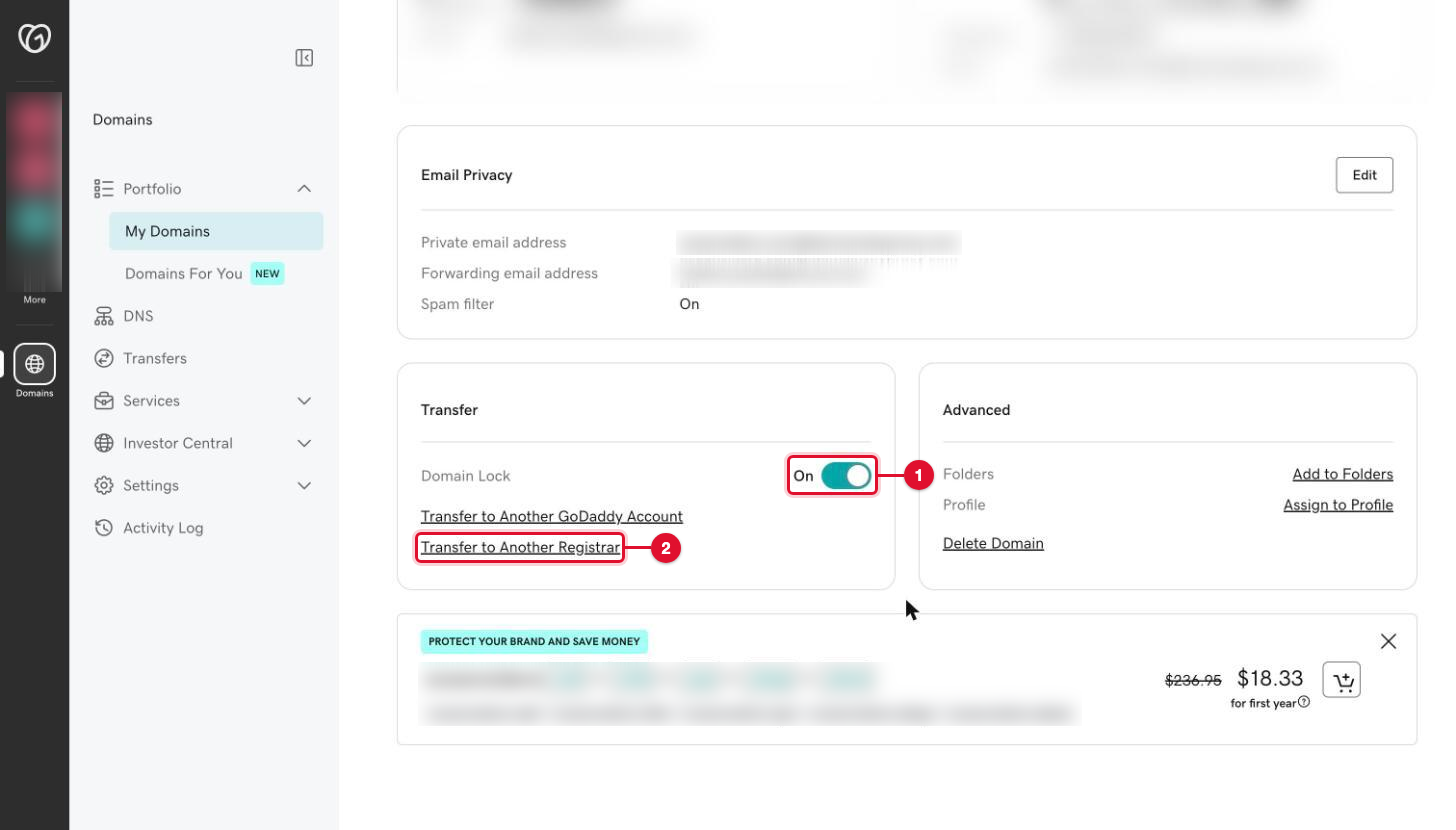
Open the domain, then Overview. In the Transfer box, switch Domain Lock off. GoDaddy also asks for Domain Privacy to be off, and Domain Protection set to none. Privacy comes back at Cloudflare, where it's included.
Get the authorization code
Select Transfer to Another Registrar, read the checklist and select Continue with transfer. GoDaddy asks you to verify with a code. Then select Click here to see Authorization Code and copy it. GoDaddy also emails it to the domain's owner. Treat it like a password: paste it, never send it to anyone.
Start the transfer at Cloudflare
In Cloudflare, open Transfer domains under Domains. Select your domain, paste the authorization code and continue. Check the contact details are yours, check the price, and select Confirm transfer.
Approve it at GoDaddy
GoDaddy emails you about the transfer. To finish it the same day, open GoDaddy, then Transfers, then Transfers Out, check the domain and select Approve Transfer. It usually completes within 30 minutes after that. If nobody approves it, GoDaddy approves it by itself within 7 days of the start. Cloudflare says the whole transfer can take up to 10 days.
You'll know it worked whenthe domain shows in Cloudflare under Domains, then Registrations, with an expiry date a year later and Auto-renew on, and the site and email still work.
If something goes wrong
Email stopped arriving
The MX record is missing or wrong. In Cloudflare, compare the MX line with your saved list.
Email arrives, but sent mail lands in spam
SPF or a DKIM record is missing, or a _domainkey record is proxied. Compare with your list and set every email record to DNS only.
Outlook or a phone can't connect to email
The autodiscover record is missing or proxied.
The site doesn't open, or says "too many redirects"
Check the @ and www records against your list. For "too many redirects", look at SSL/TLS in Cloudflare: if your host already forces https, the mode usually needs to be Full (strict), not Flexible.
Anything you can't fix in 15 minutes
Roll back. In GoDaddy, open DNS, then Nameservers, then Change Nameservers, choose GoDaddy Nameservers (recommended) and Save. GoDaddy's own records come back as they were, because you didn't delete them. Try again another day.
Cloudflare says the authorization code is wrong
Codes expire. Get a fresh one from GoDaddy and paste it again. If the transfer is refused, the domain is probably still locked or inside the 60 days. Nothing breaks while a transfer waits: your DNS is already on Cloudflare.
Tips
- Do Part 1 on a weekday morning. If email misbehaves, you'll notice while the day is still young.
- Delete nothing at GoDaddy. Leaving the old records in place is what makes rolling back instant.
- Keep the zone file even after everything works. It's the quickest answer to "what did the DNS look like before?"
Printable checklist
Tick each box as you go. The PDF has the same list on paper.
Want us to do it for you?
We move domains from GoDaddy and other registrars into your own Cloudflare account and check the site and email on both sides of the switch. You keep the domain in your name; we work with our own login, never yours.
Domain transfer $95
See the service: Business email, domains and DNSBook a free call
The full guide: GoDaddy to Cloudflare without losing email
DNSSEC with its waiting time, the complete email record lists, the SPF and DKIM check, a tested rollback, fixes for the usual problems, freelancer access steps, a worked example and a quiz.
Official help
Web Landscapes is not affiliated with, sponsored or endorsed by GoDaddy, Cloudflare, Microsoft or Google. Product names and logos are trademarks of their owners, used here only to describe their products.
Next guideSet up business email with Google Workspace →