


Web Landscapes Guides Stripe and PayPal checkout
Take payments with Stripe or PayPal
A Payment Link lets your customers pay a deposit, a gift card or a product from a button on your site, with no code and no shopping cart. The money goes from your customers to your own bank.
- Time
- About 1 hour, plus Stripe's business verification
- You'll need
- Your business details, the bank account for payouts, and the list of what you sell with prices
- The result
- A tested payment button on your site, receipts going to your customers, and the money landing in your account
Before you start
- Your own account, in your business's name. The payment account must be yours, with your bank. Never take payments through someone else's account, even "for now".
- Your business details: legal name, tax ID, business address, phone, and the bank account where payouts should go.
- What you sell, in writing: each item and its price. For example, a $50 gift card and a $20 booking deposit.
- Where the button goes: the page on your site, and access to edit it (your site builder, or the person who looks after your site).
Never send anyone your password, a verification code or a secret API key. If someone helps you, invite them to your account as a team member (see the end of the Stripe part).
Open your Stripe account
Sign up
Go to stripe.com and select Sign up or Start now. Use your business email and a password from your password manager.
Turn on two-step login
Turn on 2-step verification when Stripe offers it, with an authenticator app or a security key. This account holds your money; treat it like your bank login.
Verify your business
Stripe asks for the business type, legal name, tax ID, address, the details of the person responsible for the account, and the bank account for payouts. Have them ready. Until this is done, you can test but can't receive payouts.
Choose your statement descriptor
The statement descriptor is the short name your customers see on their card statement, for example
QUILLFEATHER DENTAL. Make it a name they'll recognize. A charge they don't recognize turns into a dispute.You'll know it worked whenyour dashboard shows no "verify your business" notice, and your payout bank shows its last four digits.
Add what you sell
Create a product
Open Product catalog and select Create product (some accounts say + Add product). Type the Name your customers will see, like
Gift card, $50, and a one-line description.Set the price
Under the price, choose One-off for things bought once or Recurring for memberships, and type the amount. Select Add product. Repeat for each item.
TipDon't change the price of a product people already pay for. Add a new price and archive the old one, so past payments still make sense.
Make a Payment Link
Create the link
Open Payment Links and select + New (or Create payment link). Pick the product. Turn on Let customers adjust quantity if they can buy more than one.
Choose what happens after payment
On the After payment tab, choose Stripe's confirmation page, or point it at a thank-you page on your site. Then select Create link.
Put it on your site
Copy the link. In your site builder, add a button ("Buy a gift card", "Pay the deposit") and paste the link as its address. Stripe can also give you a Buy button code to paste into a page, if your builder accepts embed code.
You'll know it worked whenopening the link shows your business name, the product and the right price.
Turn on receipts
Send receipts and refund notices
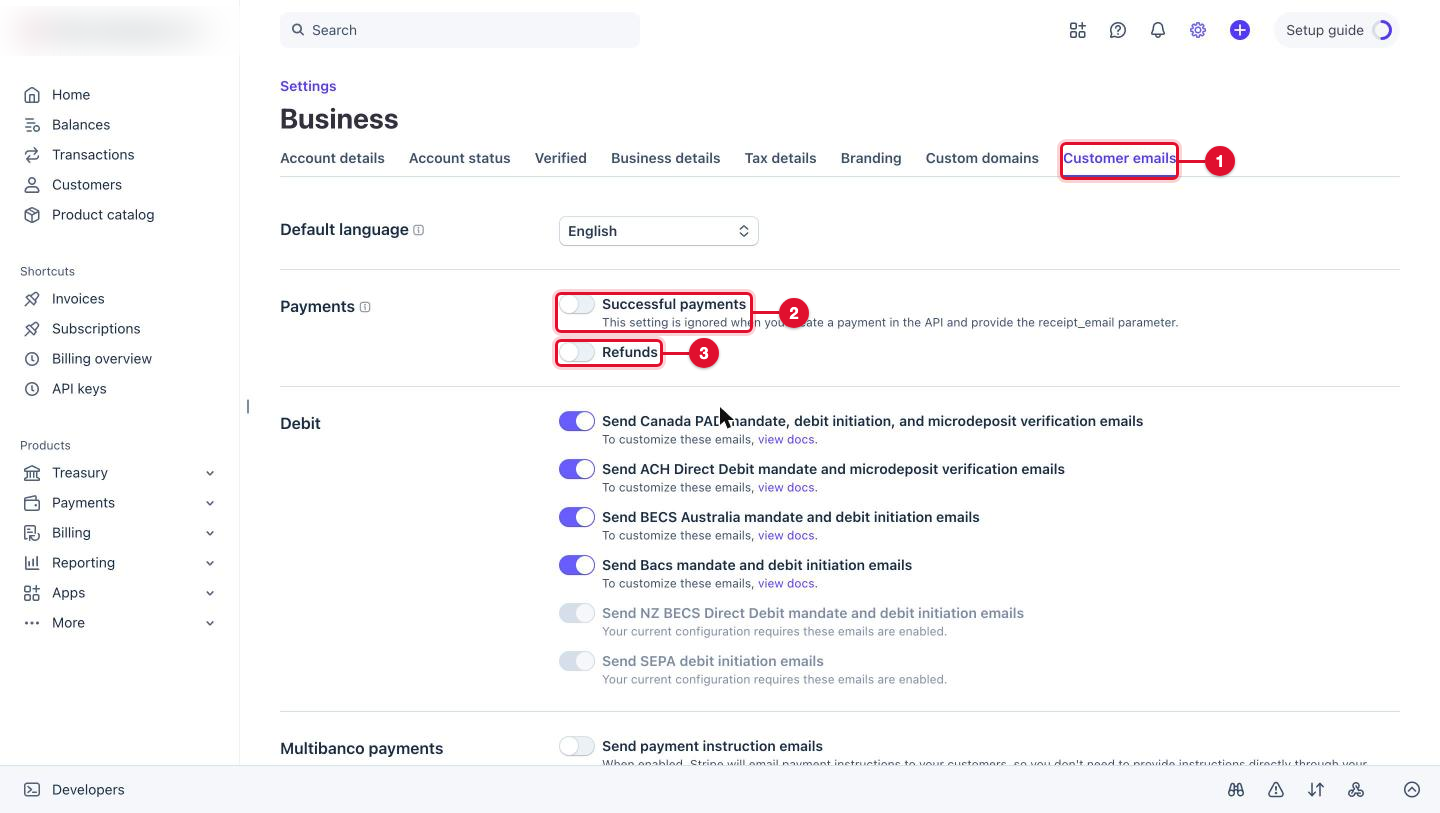
Open Settings (the gear at the top right), then Business, then the Customer emails tab (number 1). Turn on Successful payments (number 2) so customers get a receipt, and Refunds (number 3) so they're told when money goes back.
Ask your accountant about sales tax
Whether you need to collect sales tax or VAT, and where, depends on what you sell and where your customers are. Ask your accountant, in writing. If the answer is yes, Stripe's Tax settings can add it at checkout.
Test with fake money
Switch to a sandbox
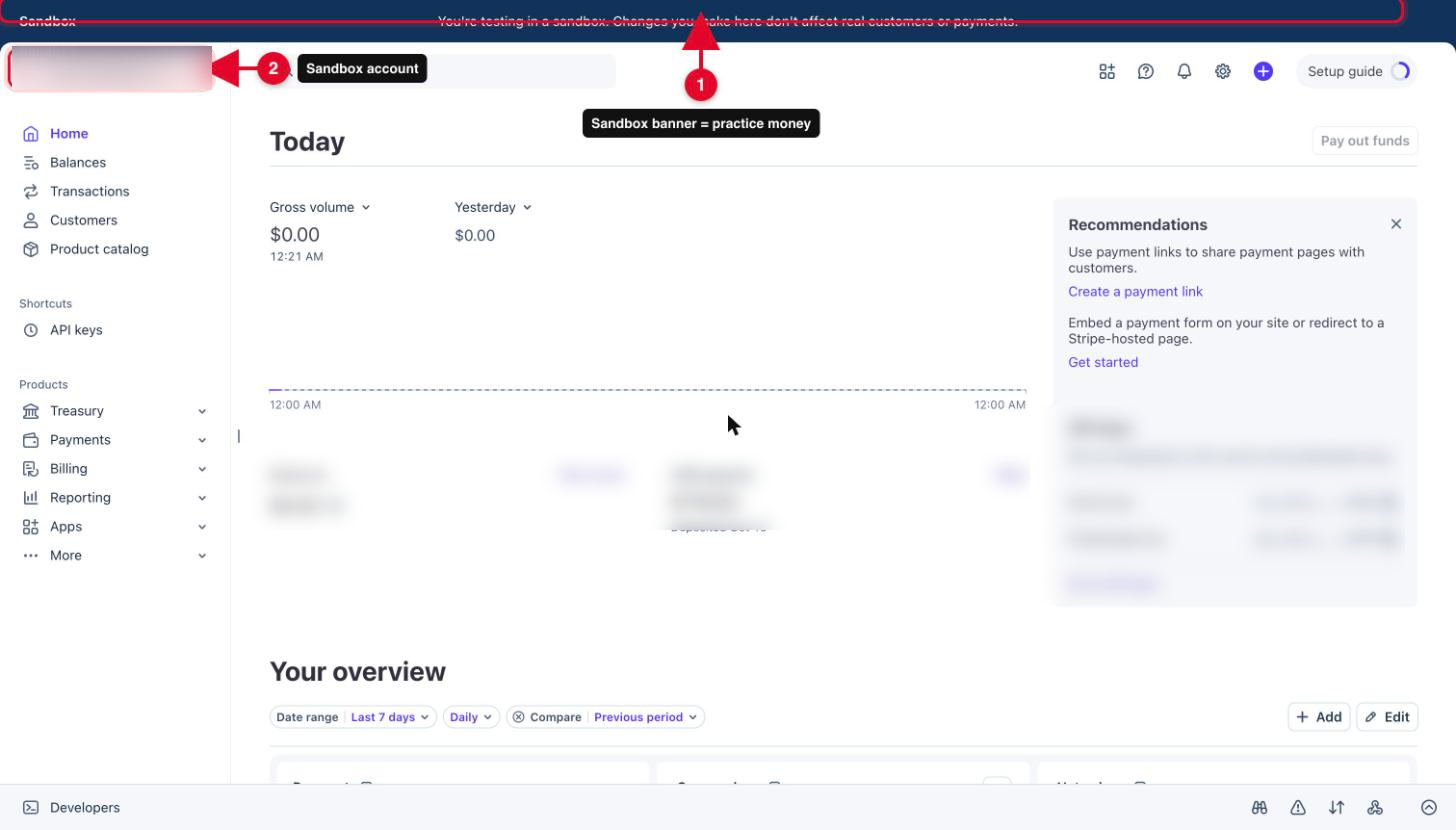
Select your account name at the top left, then Switch to sandbox. A dark Sandbox bar shows at the top (number 1): everything here is practice money. Number 2 is the sandbox's account name.
Make a test payment
In the sandbox, add the same product and make a Payment Link for it. Open the link and pay with Stripe's test card
4242 4242 4242 4242, any future expiry date and any three-digit code. Never use a real card in a sandbox.You'll know it worked whenthe payment shows under Transactions in the sandbox. Sandbox payments don't email receipts; to see one, open the payment and use Receipt history > Send receipt.
Go live
Leave the sandbox
Select the account name at the top left and choose your live account. The Sandbox bar disappears. Check the button on your site uses the live link (live links start with
buy.stripe.comand don't say test).Check the live link without paying
Open the live link from your site. Check it shows the right item and price, then close it before you pay. Don't test by paying with a real card: Stripe's terms don't allow testing in live mode with real card details. When your first real payment comes in, check it in your dashboard.
You'll know it worked whenthe live payment page opens from your site with the right item and price, and nothing was paid.
If someone helps you, invite them
Open Settings, then Team and security, then Team, and select Add member. Type their email (number 1), pick the narrowest role that fits the job (number 2) and select Send invites (number 3). A developer who builds a checkout needs Developer; someone who only looks at payments needs a view-only role.
 Important
Stripe's own description says the Developer role "can create secret keys, which grant access to almost all Stripe resources". Give it only to someone you trust, and remove people you no longer work with from the same page.
Add PayPal
Some customers prefer to pay with PayPal. You can offer it next to your Stripe button.
Open a PayPal business account
Go to paypal.com, select Sign Up and choose Business account. Use your business email and your own password, turn on 2-step verification, confirm your email and link your own bank account.
Make a payment link or button
PayPal's no-code tools are called Payment Links and Buttons: a link or QR code for a product or an amount, or a buy button for a page. Signed in to your business account, look for them under the payments or selling tools, follow PayPal's steps, and copy the link or the button code. PayPal moves these menus from time to time, so if you can't find them, use the official help link at the end of this guide.
Test it and go live
Put the real link on your site the same way as the Stripe one. Open it, check the item and price, and close it before you pay. For a full test with fake money, PayPal offers a sandbox with practice accounts; see the sandbox link at the end of this guide.
You'll know it worked whenthe live link opens from your site with the right item and price.
If something goes wrong
Stripe asks for more documents
Upload them through your own dashboard only. Stripe never asks for documents by text message or through a link from a stranger.
The payment page shows the wrong price
You probably linked an old price. Open the Payment Link, check which product and price it uses, and make a new link if needed. Don't edit the price of a product customers already pay for.
Customers don't get a receipt
Test payments never email receipts automatically. In live mode, check Customer emails has Successful payments turned on and that the payment page asked for an email.
The button still takes test payments
The site uses the sandbox link. Replace it with the live link from your live account.
A customer doesn't recognize the charge
Check your statement descriptor is a name they know. Answer them quickly and refund if needed; a dispute costs you a fee even if you win.
Someone asks for your secret key or password
Don't send it. Invite them as a team member with the right role instead, or ask them to explain exactly what they need. If a key was shown in a message or a screenshot, delete it in your dashboard and create a new one.
Printable checklist
Tick each box as you go. The PDF has the same list on paper.
Want us to do it for you?
We set up payments in your own Stripe or PayPal account: products, payment pages, deposits for bookings, receipts and the testing, and we connect them to your site. You keep the account and the money; we never touch your bank details.
Checkout on your site from $350
Official help
Web Landscapes is not affiliated with, sponsored or endorsed by Stripe or PayPal. Product names and logos are trademarks of their owners, used here only to describe their products.
Next guideSet up your Google Business Profile →